HP Kayak XW U3-W3 HP Kayak XW (Series U3-W3), Accessories Installation Guide
HP Kayak XW U3-W3 Manual
 |
View all HP Kayak XW U3-W3 manuals
Add to My Manuals
Save this manual to your list of manuals |
HP Kayak XW U3-W3 manual content summary:
- HP Kayak XW U3-W3 | HP Kayak XW (Series U3-W3), Accessories Installation Guide - Page 1
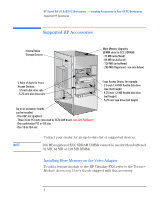
HP Kayak XW U3 & W3 PC Workstation- Installing Accessories In Your HP PC Workstation Explains in detail how to install accessories, such as extra memory, accessory boards, and additional disk drives. - HP Kayak XW U3-W3 | HP Kayak XW (Series U3-W3), Accessories Installation Guide - Page 2
HP Kayak XW U3 & W3 PC Workstation - Installing Accessories In Your HP PC Workstation Supported HP Accessories Supported HP Accessories Internal Mass Storage Devices Main Memory the HP Visualize FX4, refer to the Texture Module Accessory User's Guide shipped with this accessory. 2 English - HP Kayak XW U3-W3 | HP Kayak XW (Series U3-W3), Accessories Installation Guide - Page 3
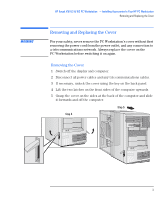
WARNING HP Kayak XW U3 & W3 PC Workstation - Installing Accessories In Your HP PC Workstation Removing and Replacing the Cover Removing and Replacing the Cover For your safety, never remove the PC Workstation's cover without first removing the power cord from the power outlet, and any connection to - HP Kayak XW U3-W3 | HP Kayak XW (Series U3-W3), Accessories Installation Guide - Page 4
HP Kayak XW U3 & W3 PC Workstation - Installing Accessories In Your HP PC Workstation Removing and Replacing the Cover Replacing the lock is unlocked. 3 Slide the cover onto the computer, making sure that the two guides at the bottom of the case slide into the two rails at the base of the computer - HP Kayak XW U3-W3 | HP Kayak XW (Series U3-W3), Accessories Installation Guide - Page 5
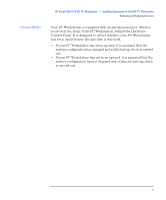
Intrusion Monitor HP Kayak XW U3 & W3 PC Workstation - Installing Accessories In Your HP PC Workstation Removing and Replacing the Cover Your PC Workstation is equipped with an intrusion monitor, which is located on the front of the PC Workstation, behind the - HP Kayak XW U3-W3 | HP Kayak XW (Series U3-W3), Accessories Installation Guide - Page 6
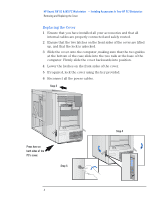
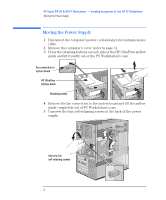
HP Kayak XW U3 & W3 PC Workstation - Installing Accessories In Your HP PC Workstation Moving the Power Supply Moving the Power Supply 1 Disconnect the computer's power cord and any telecommunications cable. 2 Remove the computer's cover (refer to page 3). 3 Press the retaining buttons on each side - HP Kayak XW U3-W3 | HP Kayak XW (Series U3-W3), Accessories Installation Guide - Page 7
WARNING HP Kayak XW U3 & W3 PC Workstation - Installing Accessories In Your HP PC Workstation Moving the Power Supply To avoid electrical shock, into the computer. 3 Tighten the four self-retaining screws. 4 Replace the HP UltraFlow airflow guide. 5 Reconnect the fan to the system board. English 7 - HP Kayak XW U3-W3 | HP Kayak XW (Series U3-W3), Accessories Installation Guide - Page 8
CAUTION NOTE HP Kayak XW U3 & W3 PC Workstation - Installing Accessories In Your HP PC Workstation Installing Memory Installing Memory Main Memory Modules If you need more main memory to run your application software, you can install up to 1GB of memory in four DIMM slots. Main memory upgrades are - HP Kayak XW U3-W3 | HP Kayak XW (Series U3-W3), Accessories Installation Guide - Page 9
HP Kayak XW U3 & W3 PC Workstation - Installing Accessories In Your HP PC Workstation Installing Memory 8 The location of the memory module slots is shown here. 9 cables and power cords. Replace the cover (refer to page 4). 12 Check the HP Summary Screen to verify the new configuration. English 9 - HP Kayak XW U3-W3 | HP Kayak XW (Series U3-W3), Accessories Installation Guide - Page 10
HP Kayak XW U3 & W3 PC Workstation - Installing Accessories In Your HP PC Workstation Installing Mass Storage Devices Installing Mass Storage Devices The computer has two internal shelves (for hard disk drives) and five front-access drive - HP Kayak XW U3-W3 | HP Kayak XW (Series U3-W3), Accessories Installation Guide - Page 11
HP Kayak XW U3 & W3 PC Workstation - Installing Accessories In Your HP PC Workstation Installing Mass Storage SCSI with two connectors. • A flexible disk drive cable with a single connector. This supports a flexible disk drive (the connector is attached to the flexible disk drive supplied). • - HP Kayak XW U3-W3 | HP Kayak XW (Series U3-W3), Accessories Installation Guide - Page 12
HP Kayak XW U3 & W3 PC Workstation - Installing Accessories In Your HP PC Workstation Installing Mass Storage Devices Which Power Ultra ATA-33 IDE controller. • The Ultra ATA-33 IDE controller, on the PCI bus, supports up to two fast (33 MB per second) IDE devices. • The Ultra wide 16-bit SCSI controller - HP Kayak XW U3-W3 | HP Kayak XW (Series U3-W3), Accessories Installation Guide - Page 13
HP Kayak XW U3 & W3 PC Workstation - Installing Accessories In Your HP disks. Disk striping is supported only in Windows NT 4.0. The Adaptec CI/O Array Manager software can be used to must be removed or disabled before installation in your computer. Refer to the drive's installation guide for more - HP Kayak XW U3-W3 | HP Kayak XW (Series U3-W3), Accessories Installation Guide - Page 14
CAUTION HP Kayak XW U3 & W3 PC Workstation - Installing Accessories In Your HP PC Workstation Installing Mass Storage page 3). 3 Remove the fan connection to the system board (refer to the illustration on page 6). 4 Press the retaining buttons on each side of the HP UltraFlow airflow guide and lift - HP Kayak XW U3-W3 | HP Kayak XW (Series U3-W3), Accessories Installation Guide - Page 15
HP Kayak XW U3 & W3 PC Workstation - Installing Accessories In Your HP PC Workstation Installing Mass Storage Devices 7 Secure the drive with the four self-retaining screws. 8 Locate the appropriate data cable for the hard disk drive. - HP Kayak XW U3-W3 | HP Kayak XW (Series U3-W3), Accessories Installation Guide - Page 16
NOTE HP Kayak XW U3 & W3 PC Workstation - Installing Accessories In Your HP PC Workstation Installing Mass Remove the computer's cover (refer to page 3). 3 Remove the fan connection to the system board (refer to page 6). 4 Press the retaining buttons on each side of the HP UltraFlow airflow guide - HP Kayak XW U3-W3 | HP Kayak XW (Series U3-W3), Accessories Installation Guide - Page 17
Set the drive on the tray HP Kayak XW U3 & W3 PC Workstation - Installing Accessories In Your HP PC Workstation Installing Mass Storage Devices 7 Mount the drive on the tray as shown below. Fix the drive to the tray 8 Slide the drive tray - HP Kayak XW U3-W3 | HP Kayak XW (Series U3-W3), Accessories Installation Guide - Page 18
HP Kayak XW U3 & W3 PC Workstation - Installing Accessories In Your HP PC Workstation Installing Mass Storage Devices 9 and tighten the four selfretaining screws (refer to page 7). 12 Replace the HP UltraFlow airflow guide and reconnect the fan to the system board (refer to the illustration on - HP Kayak XW U3-W3 | HP Kayak XW (Series U3-W3), Accessories Installation Guide - Page 19
HP Kayak XW U3 & W3 PC Workstation - Installing Accessories In Your HP PC Workstation Installing Mass Storage Devices If an error message appears, follow the instructions provided by the Error Message Utility. When prompted, press to run the Setup program. 4 Select the Advanced menu, and the - HP Kayak XW U3-W3 | HP Kayak XW (Series U3-W3), Accessories Installation Guide - Page 20
HP Kayak XW U3 & W3 PC Workstation - Installing Accessories In Your HP PC Workstation Installing Mass Storage Devices Before Installing an IDE Device Before Installing a SCSI Device Refer to the drive's installation guide to see if you must set jumpers or if there is a special installation - HP Kayak XW U3-W3 | HP Kayak XW (Series U3-W3), Accessories Installation Guide - Page 21
HP Kayak XW U3 & W3 PC Workstation - Installing Accessories In Your HP PC Workstation Installing Mass Storage Devices 8 Connect the data and power cables to the rear of the device. (The connectors are shaped to go in - HP Kayak XW U3-W3 | HP Kayak XW (Series U3-W3), Accessories Installation Guide - Page 22
HP Kayak XW U3 & W3 PC Workstation - Installing Accessories In Your HP PC Workstation Installing Mass Storage Devices Completing the Installation of a Drive When an IDE CD-ROM Drive Is Installed 1 Switch on the computer and press when Setup appears. 2 In the Setup program, select the Advanced - HP Kayak XW U3-W3 | HP Kayak XW (Series U3-W3), Accessories Installation Guide - Page 23
CAUTION NOTE HP Kayak XW U3 & W3 PC Workstation - Installing Accessories In Your HP PC Workstation Installing Accessory Boards Installing Accessory Boards Static electricity can damage electronic components. Turn OFF all equipment. Don't let your clothes touch the accessory. - HP Kayak XW U3-W3 | HP Kayak XW (Series U3-W3), Accessories Installation Guide - Page 24
HP Kayak XW U3 & W3 PC Workstation - Installing Accessories In Your HP PC Workstation Installing Accessory Boards 4 Unscrew and remove the slot cover. Store it in a safe place. If the slot cover is tight, loosen the screws on the adjacent slots. Unscrew and remove the slot cover 5 Hold the board - HP Kayak XW U3-W3 | HP Kayak XW (Series U3-W3), Accessories Installation Guide - Page 25
HP Kayak XW U3 & W3 PC Workstation - Installing Accessories In Your HP PC Workstation Installing Accessory Boards 7 Secure installed an ISA accessory board that uses any interrupt, you must run the Setup program and reserve the IRQ for the accessory board. This allows PCI devices to be automatically - HP Kayak XW U3-W3 | HP Kayak XW (Series U3-W3), Accessories Installation Guide - Page 26
NOTE HP Kayak XW U3 & W3 PC Workstation - Installing Accessories In Your HP PC Workstation Installing a Processor Installing a Processor Some operating systems support a second processor for enhanced performance. Contact your authorized reseller for up-to-date information. The Setup program - HP Kayak XW U3-W3 | HP Kayak XW (Series U3-W3), Accessories Installation Guide - Page 27
HP Kayak XW U3 & W3 PC Workstation - Installing Accessories In Your HP PC Workstation Installing a Processor 7 The system board has two processor sockets and a VRM slot for each processor. If you are changing the existing processor, remove section of the HP UltraFlow airflow guide covering the - HP Kayak XW U3-W3 | HP Kayak XW (Series U3-W3), Accessories Installation Guide - Page 28
Installation of a Processor NOTE HP Kayak XW U3 & W3 PC Workstation - Installing Accessories In Your HP PC Workstation Installing a speed and processor speed. Refer to the manual supplied with the processor to verify which bus and processor speeds are supported. NOTE Switch 1 UP1 Switch 2 UP
-
 1
1 -
 2
2 -
 3
3 -
 4
4 -
 5
5 -
 6
6 -
 7
7 -
8
-
9
-
10
-
11
-
12
-
13
-
14
-
15
-
16
-
17
-
18
-
19
-
20
-
21
-
22
-
23
-
24
-
25
-
26
-
27
-
28
 |
 |

HP Kayak XW U3 & W3 PC Workstation—
Installing Accessories
In Your HP PC Workstation
Explains in detail how to install accessories, such as extra memory,
accessory boards, and additional disk drives.