HP Kayak XW U3-W3 HP Kayak XW (Series U3-W3), Accessories Installation Guide - Page 6
Moving the Power Supply
 |
View all HP Kayak XW U3-W3 manuals
Add to My Manuals
Save this manual to your list of manuals |
Page 6 highlights
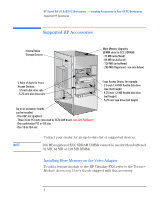
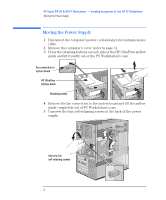
HP Kayak XW U3 & W3 PC Workstation - Installing Accessories In Your HP PC Workstation Moving the Power Supply Moving the Power Supply 1 Disconnect the computer's power cord and any telecommunications cable. 2 Remove the computer's cover (refer to page 3). 3 Press the retaining buttons on each side of the HP UltraFlow airflow guide and lift it partly out of the PC Workstation's case. Fan connection to system board HP UltraFlow Airflow Guide Retaining button 4 Remove the fan connection to the system board and lift the airflow guide completely out of PC Workstation's case. 5 Unscrew the four self-retaining screws at the back of the power supply. Unscrew the self-retaining screws 6 English
-
 1
1 -
 2
2 -
 3
3 -
 4
4 -
 5
5 -
 6
6 -
 7
7 -
 8
8 -
 9
9 -
 10
10 -
 11
11 -
 12
12 -
13
-
14
-
15
-
16
-
17
-
18
-
19
-
20
-
21
-
22
-
23
-
24
-
25
-
26
-
27
-
28
 |
 |

HP Kayak XW U3 & W3 PC Workstation
— Installing Accessories In Your HP PC Workstation
Moving the Power Supply
6
English
Moving the Power Supply
1
Disconnect the computer’s power cord and any telecommunications
cable.
2
Remove the computer’s cover (refer to page 3).
3
Press the retaining buttons on each side of the HP UltraFlow airflow
guide and lift it partly out of the PC Workstation’s case.
4
Remove the fan connection to the system board and lift the airflow
guide completely out of PC Workstation’s case.
5
Unscrew the four self-retaining screws at the back of the power
supply.
HP UltraFlow
Airflow Guide
Retaining button
Fan connection to
system board
Unscrew the
self-retaining screws