HP LaserJet P4510 HP LaserJet P4010 and P4510 Series Printers Embedded Web Ser - Page 44
To turn on the AutoSend feature, Enable AutoSend, Send to HP, Apply
 |
View all HP LaserJet P4510 manuals
Add to My Manuals
Save this manual to your list of manuals |
Page 44 highlights
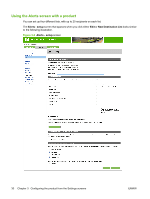
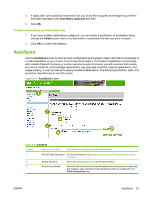
Table 3-5 AutoSend (continued) Callout Area on the screen 4 E-Mail destinations 5 Test 6 Send to HP Information or capability that the area provides A list of e-mail addresses (up to 20 destinations) is available if a permanent device storage is installed. (One e-mail address is saved if a permanent device storage is not installed.) Click this button to save your settings and to send the information immediately, so that you can make sure that the recipient receives the messages. Select this check box to send device configuration and supplies status information to HP on a regular basis. The information will be sent to an HP e-mail address (for example, [email protected]) in a text-based file with an .XML file extension. This file will be created in English. To view more information about how HP treats the information that is sent by AutoSend, click Hewlett-Packard Online Privacy Statement. To turn on the AutoSend feature Use the following procedure to make the AutoSend feature available. 1. Make outgoing e-mail functions available by following the instructions that are listed in this chapter. (For more information, see E-mail Server on page 26.) 2. Select the Enable AutoSend check box. 3. Click an option to specify the interval at which you want the product to send the productconfiguration and supplies-usage information to the e-mail recipients (determined in the next step), and then type the number of days, weeks, months, or pages printed. 4. Configure up to 20 destinations using the format that appears on the screen. 5. To send device configuration and supplies status information to HP, select the Send to HP check box. 6. Click Apply. 34 Chapter 3 Configuring the product from the Settings screens ENWW
-
 1
1 -
2
-
3
-
4
-
5
-
6
-
7
-
8
-
9
-
10
-
11
-
12
-
13
-
14
-
15
-
16
-
17
-
18
-
19
-
20
-
21
-
22
-
23
-
24
-
25
-
26
-
27
-
28
-
29
-
30
-
31
-
32
-
33
-
34
-
35
-
36
-
37
-
38
-
 39
39 -
 40
40 -
 41
41 -
 42
42 -
 43
43 -
 44
44 -
 45
45 -
 46
46 -
 47
47 -
 48
48 -
 49
49 -
50
-
51
-
52
-
53
-
54
-
55
-
56
-
57
-
58
-
59
-
60
-
61
-
62
-
63
-
64
-
65
-
66
-
67
-
68
-
69
-
70
-
71
-
72
 |
 |