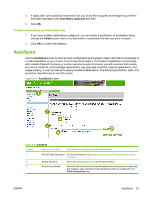
HP LaserJet P4510 HP LaserJet P4010 and P4510 Series Printers Embedded Web Ser - Page 48
Password, New Password, Verify Password, Apply, PJL Printer Job Language is
 |
View all HP LaserJet P4510 manuals
Add to My Manuals
Save this manual to your list of manuals |
Page 48 highlights
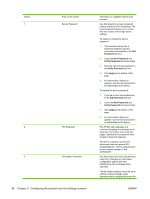
Callout 1 Area on the screen Device Password 2 PJL Password 3 File System Password 38 Chapter 3 Configuring the product from the Settings screens Information or capability that the area provides Use this feature to set your password using a maximum of 16 characters. The device password allows you to control who can access and change device settings. To assign or change the device password: 1. If the device currently has a password assigned, type the current device password in the Old Password text box. 2. Leave the New Password and Verify Password text boxes blank. 3. Type the same device password in the Verify Password text box. 4. Click Apply at the bottom of the page. 5. An authorization dialog box appears. Use the new password to re-authenticate to the device. To disable the device password: 1. Type the current device password in the Old Password text box. 2. Leave the New Password and Verify Password text boxes blank. 3. Click Apply at the bottom of the page. 4. An authorization dialog box appears. Use the new password to re-authenticate to the device. PJL (Printer Job Language) is a command language that enables some features of the printer such as banner pages. Setting the PJL password locks access to these PJL features. Set the PJL password so that only authorized users can access PJL enabled features. The PJL password can be any number between 1 and 2147483647. Use this feature to prevent unauthorized users from changing any file system configuration options and from performing a secure storage erase operation. The file system password must be set to perform a secure storage erase operation and to configure the secure file ENWW
-
 1
1 -
2
-
3
-
4
-
5
-
6
-
7
-
8
-
9
-
10
-
11
-
12
-
13
-
14
-
15
-
16
-
17
-
18
-
19
-
20
-
21
-
22
-
23
-
24
-
25
-
26
-
27
-
28
-
29
-
30
-
31
-
32
-
33
-
34
-
35
-
36
-
37
-
38
-
39
-
40
-
41
-
42
-
 43
43 -
 44
44 -
 45
45 -
 46
46 -
 47
47 -
 48
48 -
 49
49 -
 50
50 -
 51
51 -
 52
52 -
 53
53 -
54
-
55
-
56
-
57
-
58
-
59
-
60
-
61
-
62
-
63
-
64
-
65
-
66
-
67
-
68
-
69
-
70
-
71
-
72
 |
 |