HP Latex 820 HP Scitex LX850 & LX820 Printer: Installation Guide - Page 24
Remove 4 plastic ties from the left side cover.
 |
View all HP Latex 820 manuals
Add to My Manuals
Save this manual to your list of manuals |
Page 24 highlights
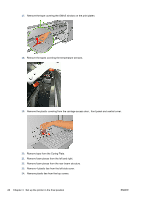
17. Remove the tape covering the OMAS window on the print platen. 18. Remove the tapes covering the temperature sensors. 19. Remove the plastic covering from the carriage access door , front panel and central cover. 20. Remove tape from the Curing Plate. 21. Remove foam pieces from the left and right. 22. Remove foam pieces from the rear beam structure. 23. Remove 4 plastic ties from the left side cover. 24. Remove plastic ties from the top covers. 20 Chapter 4 Set up the printer in the final position ENWW
-
 1
1 -
2
-
3
-
4
-
5
-
6
-
7
-
8
-
9
-
10
-
11
-
12
-
13
-
14
-
15
-
16
-
17
-
18
-
 19
19 -
 20
20 -
 21
21 -
 22
22 -
 23
23 -
 24
24 -
 25
25 -
 26
26 -
 27
27 -
 28
28 -
 29
29 -
30
-
31
-
32
-
33
-
34
-
35
-
36
-
37
-
38
-
39
-
40
-
41
-
42
-
43
-
44
-
45
-
46
-
47
-
48
-
49
-
50
-
51
-
52
-
53
-
54
-
55
-
56
-
57
-
58
-
59
-
60
-
61
-
62
-
63
-
64
-
65
-
66
-
67
-
68
-
69
-
70
-
71
-
72
-
73
-
74
-
75
-
76
-
77
-
78
-
79
-
80
-
81
-
82
-
83
-
84
-
85
 |
 |

17.
Remove the tape covering the OMAS window on the print platen.
18.
Remove the tapes covering the temperature sensors.
19.
Remove the plastic covering from the carriage access door , front panel and central cover.
20.
Remove tape from the Curing Plate.
21.
Remove foam pieces from the left and right.
22.
Remove foam pieces from the rear beam structure.
23.
Remove 4 plastic ties from the left side cover.
24.
Remove plastic ties from the top covers.
20
Chapter 4
Set up the printer in the final position
ENWW