HP Latex 820 HP Scitex LX850 & LX820 Printer: Installation Guide - Page 51
Purge and Setup Menu, Force, Normal Boot, At this point
 |
View all HP Latex 820 manuals
Add to My Manuals
Save this manual to your list of manuals |
Page 51 highlights
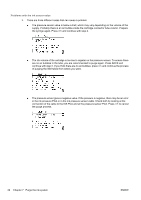
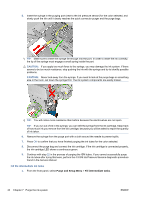
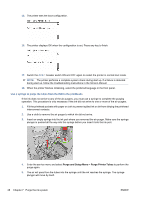
10. The front panel prompts you to confirm that ink has reached the air purgers. Look at the air purgers and confirm that each color arrived to the air purger. 11. If ink did not reach one of the air purgers, use a syringe to complete the operation. For instructions, see Use a syringe to purge the tubes from the ISM to the printheads on page 48. 12. Wear gloves and use a cloth to remove the air purgers, as some ink may spill. When you have finished removing the air purgers, close the carriage cover and access window. Press OK to finish. 13. At this point, check to make sure that the rear ink leakage sensor is correctly placed at the bottom of the tray (it should be touching the tray). 14. From the front panel, enter the diagnostic menu and select Purge and Setup Menu > Force Normal Boot . ENWW 47
-
 1
1 -
2
-
3
-
4
-
5
-
6
-
7
-
8
-
9
-
10
-
11
-
12
-
13
-
14
-
15
-
16
-
17
-
18
-
19
-
20
-
21
-
22
-
23
-
24
-
25
-
26
-
27
-
28
-
29
-
30
-
31
-
32
-
33
-
34
-
35
-
36
-
37
-
38
-
39
-
40
-
41
-
42
-
43
-
44
-
45
-
 46
46 -
 47
47 -
 48
48 -
 49
49 -
 50
50 -
 51
51 -
 52
52 -
 53
53 -
 54
54 -
 55
55 -
 56
56 -
57
-
58
-
59
-
60
-
61
-
62
-
63
-
64
-
65
-
66
-
67
-
68
-
69
-
70
-
71
-
72
-
73
-
74
-
75
-
76
-
77
-
78
-
79
-
80
-
81
-
82
-
83
-
84
-
85
 |
 |
