HP Latex 820 HP Scitex LX850 & LX820 Printer: Installation Guide - Page 49
Purge and Setup Menu, Purge, Printer Tubes, Purge the tubes from the ISM to the printheads, WARNING
 |
View all HP Latex 820 manuals
Add to My Manuals
Save this manual to your list of manuals |
Page 49 highlights
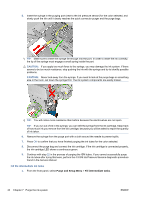
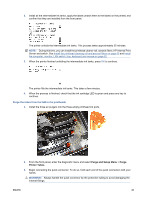
2. Install all the intermediate ink tanks, apply the labels (match them to the labels on the printer) and confirm that they are installed from the front panel. The printer unfolds the intermediate ink tanks. This process takes approximately 25 minutes. NOTE: During this time, you can install the printhead cleaner roll, aerosol filters, HP Internal Print Server and switch. See Install the printhead cleaning roll and aerosol filters on page 50 and Install the computer, monitor, LAN switch, tray, keyboard and mouse on page 52. 3. When the printer finished unfolding the intermediate ink tanks, press OK to continue. The printer fills the intermediate ink tanks. This takes a few minutes. 4. When the process is finished, check that the ink cartridge LED is green and press any key to continue. Purge the tubes from the ISM to the printheads 1. Install the three air purgers into the three empty printhead ink ports. 2. From the front panel, enter the diagnostic menu and select Purge and Setup Menu > Purge Printer Tubes. 3. Begin connecting the quick connector. To do so, hold each end of the quick connection with your hands. WARNING! Always handle the quick connector by the protective tubing to avoid damaging the internal fittings. ENWW 45
-
 1
1 -
2
-
3
-
4
-
5
-
6
-
7
-
8
-
9
-
10
-
11
-
12
-
13
-
14
-
15
-
16
-
17
-
18
-
19
-
20
-
21
-
22
-
23
-
24
-
25
-
26
-
27
-
28
-
29
-
30
-
31
-
32
-
33
-
34
-
35
-
36
-
37
-
38
-
39
-
40
-
41
-
42
-
43
-
 44
44 -
 45
45 -
 46
46 -
 47
47 -
 48
48 -
 49
49 -
 50
50 -
 51
51 -
 52
52 -
 53
53 -
 54
54 -
55
-
56
-
57
-
58
-
59
-
60
-
61
-
62
-
63
-
64
-
65
-
66
-
67
-
68
-
69
-
70
-
71
-
72
-
73
-
74
-
75
-
76
-
77
-
78
-
79
-
80
-
81
-
82
-
83
-
84
-
85
 |
 |
