HP M3027x HP LaserJet M3027/M3035 MFP - User Guide for Model Numbers CC476A/CC - Page 180
Clear jams from the input-tray areas, If the paper is not visible, look in the front door area.
 |
UPC - 883585038671
View all HP M3027x manuals
Add to My Manuals
Save this manual to your list of manuals |
Page 180 highlights
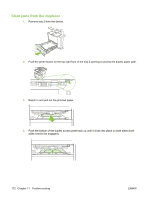
Clear jams from the input-tray areas NOTE: To remove media from the tray 1 area, slowly pull the media out of the device. For all other trays, complete the following procedure. 1. Slide the tray out of the device, and remove any damaged paper from the tray. 2. If the edge of the paper is visible in the feed area, slowly pull the paper down and out of the device. If the paper is not visible, look in the front door area. NOTE: Do not force the paper if it will not move easily. If the paper is stuck in a tray, try removing it through the tray above (if applicable) or through the front door area. 168 Chapter 11 Problem solving ENWW
-
 1
1 -
2
-
3
-
4
-
5
-
6
-
7
-
8
-
9
-
10
-
11
-
12
-
13
-
14
-
15
-
16
-
17
-
18
-
19
-
20
-
21
-
22
-
23
-
24
-
25
-
26
-
27
-
28
-
29
-
30
-
31
-
32
-
33
-
34
-
35
-
36
-
37
-
38
-
39
-
40
-
41
-
42
-
43
-
44
-
45
-
46
-
47
-
48
-
49
-
50
-
51
-
52
-
53
-
54
-
55
-
56
-
57
-
58
-
59
-
60
-
61
-
62
-
63
-
64
-
65
-
66
-
67
-
68
-
69
-
70
-
71
-
72
-
73
-
74
-
75
-
76
-
77
-
78
-
79
-
80
-
81
-
82
-
83
-
84
-
85
-
86
-
87
-
88
-
89
-
90
-
91
-
92
-
93
-
94
-
95
-
96
-
97
-
98
-
99
-
100
-
101
-
102
-
103
-
104
-
105
-
106
-
107
-
108
-
109
-
110
-
111
-
112
-
113
-
114
-
115
-
116
-
117
-
118
-
119
-
120
-
121
-
122
-
123
-
124
-
125
-
126
-
127
-
128
-
129
-
130
-
131
-
132
-
133
-
134
-
135
-
136
-
137
-
138
-
139
-
140
-
141
-
142
-
143
-
144
-
145
-
146
-
147
-
148
-
149
-
150
-
151
-
152
-
153
-
154
-
155
-
156
-
157
-
158
-
159
-
160
-
161
-
162
-
163
-
164
-
165
-
166
-
167
-
168
-
169
-
170
-
171
-
172
-
173
-
174
-
 175
175 -
 176
176 -
 177
177 -
 178
178 -
 179
179 -
 180
180 -
 181
181 -
 182
182 -
 183
183 -
 184
184 -
 185
185 -
186
-
187
-
188
-
189
-
190
-
191
-
192
-
193
-
194
-
195
-
196
-
197
-
198
-
199
-
200
-
201
-
202
-
203
-
204
-
205
-
206
-
207
-
208
-
209
-
210
-
211
-
212
-
213
-
214
-
215
-
216
-
217
-
218
-
219
-
220
-
221
-
222
-
223
-
224
-
225
-
226
-
227
-
228
-
229
-
230
-
231
-
232
-
233
-
234
-
235
-
236
-
237
-
238
-
239
-
240
-
241
-
242
-
243
-
244
-
245
-
246
-
247
-
248
-
249
-
250
-
251
-
252
-
253
-
254
-
255
-
256
-
257
-
258
-
259
-
260
-
261
-
262
-
263
-
264
-
265
-
266
-
267
-
268
-
269
-
270
 |
 |

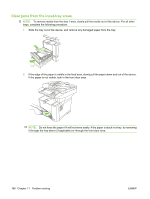
Clear jams from the input-tray areas
NOTE:
To remove media from the tray 1 area, slowly pull the media out of the device. For all other
trays, complete the following procedure.
1.
Slide the tray out of the device, and remove any damaged paper from the tray.
2.
If the edge of the paper is visible in the feed area, slowly pull the paper down and out of the device.
If the paper is not visible, look in the front door area.
NOTE:
Do not force the paper if it will not move easily. If the paper is stuck in a tray, try removing
it through the tray above (if applicable) or through the front door area.
168
Chapter 11
Problem solving
ENWW