HP M537 User Guide - Page 33
Using the Camera Setup Menu, Display Brightness, Medium, Camera Sounds, Date & Time - battery
 |
UPC - 882780834033
View all HP M537 manuals
Add to My Manuals
Save this manual to your list of manuals |
Page 33 highlights
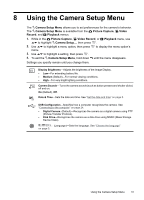
8 Using the Camera Setup Menu The Camera Setup Menu allows you to set preferences for the camera's behavior. The Camera Setup Menu is available from the Picture Capture, Video Record, and Playback menus. 1. While in the Picture Capture, Video Record, or Playback menu, use to highlight Camera Setup..., then press . 2. Use to highlight a menu option, then press to display the menu option's menu. 3. Use to highlight a setting, then press . 4. To exit the Camera Setup Menu, hold down until the menu disappears. Settings you specify remain until you change them. Display Brightness-Adjusts the brightness of the Image Display. • Low-For extending battery life. • Medium (Default)-For normal viewing conditions. • High-For very bright lighting conditions. Camera Sounds-Turns the camera sounds (such as button presses and shutter clicks) off and on. On (Default), Off. Date & Time-Sets the date and time. See "Set the date and time" on page 5. USB Configuration-Specifies how a computer recognizes the camera. See "Connecting to the computer" on page 24. • Digital Camera (Default)-Recognizes the camera as a digital camera using PTP (Picture Transfer Protocol). • Disk Drive-Recognizes the camera as a disk drive using MSDC (Mass Storage Device Class). (Language)-Sets the language. See "Choose the language" on page 5. Using the Camera Setup Menu 31
-
 1
1 -
2
-
3
-
4
-
5
-
6
-
7
-
8
-
9
-
10
-
11
-
12
-
13
-
14
-
15
-
16
-
17
-
18
-
19
-
20
-
21
-
22
-
23
-
24
-
25
-
26
-
27
-
 28
28 -
 29
29 -
 30
30 -
 31
31 -
 32
32 -
 33
33 -
 34
34 -
 35
35 -
 36
36 -
 37
37 -
 38
38 -
39
-
40
-
41
-
42
-
43
-
44
-
45
-
46
-
47
-
48
-
49
 |
 |
