HP OMEN 17-an000 Maintenance and Service Guide - Page 77
Remove the system board see, Remove the heatsink see
 |
View all HP OMEN 17-an000 manuals
Add to My Manuals
Save this manual to your list of manuals |
Page 77 highlights
3. Disconnect all external devices connected to the computer. 4. Remove the following components: a. Base enclosure (see Base enclosure on page 45) b. Battery (see Battery on page 38) c. Speakers (see Speakers on page 47). d. Optical drive (see Optical drive on page 48) e. Remove the fans (see Fans on page 53) f. Remove the heatsink (see Heat sink on page 54) g. Remove the system board (see System board on page 57) h. Remove the TouchPad board (see TouchPad board on page 62) Remove the display assembly: 1. Remove the six Phillips PM1.9×3.5 screws securing the left and right hinge brackets (1). 2. Remove the hinge brackets (2). Component replacement procedures 65
-
 1
1 -
2
-
3
-
4
-
5
-
6
-
7
-
8
-
9
-
10
-
11
-
12
-
13
-
14
-
15
-
16
-
17
-
18
-
19
-
20
-
21
-
22
-
23
-
24
-
25
-
26
-
27
-
28
-
29
-
30
-
31
-
32
-
33
-
34
-
35
-
36
-
37
-
38
-
39
-
40
-
41
-
42
-
43
-
44
-
45
-
46
-
47
-
48
-
49
-
50
-
51
-
52
-
53
-
54
-
55
-
56
-
57
-
58
-
59
-
60
-
61
-
62
-
63
-
64
-
65
-
66
-
67
-
68
-
69
-
70
-
71
-
 72
72 -
 73
73 -
 74
74 -
 75
75 -
 76
76 -
 77
77 -
 78
78 -
 79
79 -
 80
80 -
 81
81 -
 82
82 -
83
-
84
-
85
-
86
-
87
-
88
-
89
-
90
-
91
-
92
-
93
-
94
-
95
-
96
-
97
-
98
-
99
 |
 |

3.
Disconnect all external devices connected to the computer.
4.
Remove the following components:
a.
Base enclosure (see
Base enclosure
on page
45
)
b.
Battery (see
Battery
on page
38
)
c.
Speakers (see
Speakers
on page
47
).
d.
Optical drive (see
Optical drive
on page
48
)
e.
Remove the fans (see
Fans
on page
53
)
f.
Remove the heatsink (see
Heat sink
on page
54
)
g.
Remove the system board (see
System board
on page
57
)
h.
Remove the TouchPad board (see
TouchPad board
on page
62
)
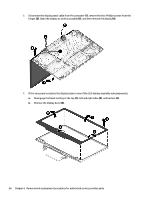
Remove the display assembly:
1.
Remove the six Phillips PM1.9×3.5 screws securing the left and right hinge brackets
(1)
.
2.
Remove the hinge brackets
(2)
.
Component replacement procedures
65