HP Officejet J3600 User Guide - Page 17
Connection information, Name and Description - printer
 |
View all HP Officejet J3600 manuals
Add to My Manuals
Save this manual to your list of manuals |
Page 17 highlights
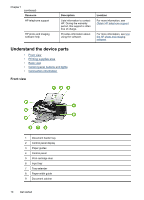
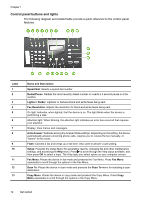
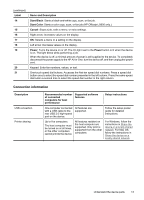
(continued) Label 14 15 16 17 18 19 20 21 Name and Description Start Black: Starts a black-and-white copy, scan, or fax job. Start Color: Starts a color copy, scan, or fax job (HP Officejet J3600 only.) Cancel: Stops a job, exits a menu, or exits settings. Right arrow: Increases values on the display. OK: Selects a menu or a setting on the display. Left arrow: Decrease values on the display. Power: Turns the device on or off. The On light next to the Power button is lit when the device is on. The light blinks while performing a job. When the device is off, a minimal amount of power is still supplied to the device. To completely disconnect the power supply to the HP All-in-One, turn the device off, and then unplug the power cord. Keypad: Enter fax numbers, values, or text. One-touch speed dial buttons: Accesses the first ten speed dial numbers. Press a speed dial button once to select the speed dial number presented in the left column. Press the same speed dial button a second time to select the speed dial number in the right column. Connection information Description USB connection Printer sharing Recommended number of connected computers for best performance Supported software features Setup instructions One computer connected with a USB cable to the rear USB 2.0 high-speed port on the device. All features are supported. Follow the setup poster guide for detailed instructions. Up to five computers. The host computer must be turned on at all times, or the other computers cannot print to the device. All features resident on the host computer are supported. Only print is supported from the other computers. For Windows, follow the instructions in Share the device on a locally shared network. For Mac OS, follow the instructions in Share the device on a locally shared network. Understand the device parts 13
-
 1
1 -
2
-
3
-
4
-
5
-
6
-
7
-
8
-
9
-
10
-
11
-
 12
12 -
 13
13 -
 14
14 -
 15
15 -
 16
16 -
 17
17 -
 18
18 -
 19
19 -
 20
20 -
 21
21 -
 22
22 -
23
-
24
-
25
-
26
-
27
-
28
-
29
-
30
-
31
-
32
-
33
-
34
-
35
-
36
-
37
-
38
-
39
-
40
-
41
-
42
-
43
-
44
-
45
-
46
-
47
-
48
-
49
-
50
-
51
-
52
-
53
-
54
-
55
-
56
-
57
-
58
-
59
-
60
-
61
-
62
-
63
-
64
-
65
-
66
-
67
-
68
-
69
-
70
-
71
-
72
-
73
-
74
-
75
-
76
-
77
-
78
-
79
-
80
-
81
-
82
-
83
-
84
-
85
-
86
-
87
-
88
-
89
-
90
-
91
-
92
-
93
-
94
-
95
-
96
-
97
-
98
-
99
-
100
-
101
-
102
-
103
-
104
-
105
-
106
-
107
-
108
-
109
-
110
-
111
-
112
-
113
-
114
-
115
-
116
-
117
-
118
-
119
-
120
-
121
-
122
-
123
-
124
-
125
-
126
-
127
-
128
-
129
-
130
-
131
-
132
-
133
-
134
-
135
-
136
-
137
-
138
-
139
-
140
-
141
-
142
-
143
-
144
-
145
-
146
-
147
-
148
-
149
-
150
-
151
-
152
-
153
-
154
-
155
-
156
-
157
-
158
-
159
-
160
-
161
-
162
-
163
-
164
-
165
-
166
-
167
-
168
-
169
-
170
-
171
-
172
-
173
-
174
-
175
-
176
-
177
-
178
-
179
-
180
-
181
-
182
-
183
-
184
-
185
-
186
 |
 |