HP P2015dn HP LaserJet P2015 - User Guide - Page 38
Print on transparencies or labels, Paper/Quality, Paper - instruction manual
 |
UPC - 882780492462
View all HP P2015dn manuals
Add to My Manuals
Save this manual to your list of manuals |
Page 38 highlights
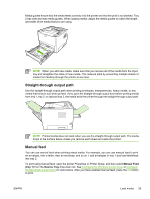
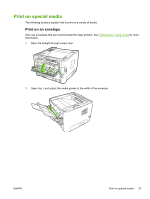
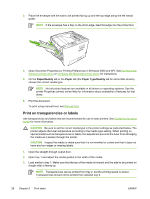
3. Place the envelope with the side to be printed facing up and the top edge along the left media guide. NOTE If the envelope has a flap on the short edge, feed that edge into the printer first. 4. Open the printer Properties (or Printing Preferences in Windows 2000 and XP). See Configure the Windows printer driver or Configure the Macintosh printer driver for instructions. 5. On the Paper/Quality tab or the Paper tab (the Paper Type/Quality tab for some Mac drivers), choose the correct media type. NOTE Not all printer features are available in all drivers or operating systems. See the printer Properties (driver) online Help for information about availability of features for that driver. 6. Print the document. To print using manual feed, see Manual feed. Print on transparencies or labels Use transparencies and labels that are recommended for use in laser printers. See Guidelines for using media for more information. CAUTION Be sure to set the correct media type in the printer settings as instructed below. The printer adjusts the fuser temperature according to the media type setting. When printing on special media such as transparencies or labels, this adjustment prevents the fuser from damaging the media as it passes through the printer. CAUTION Inspect the media to make sure that it is not wrinkled or curled and that it does not have any torn edges or missing labels. 1. Open the straight-through output door. 2. Open tray 1 and adjust the media guides to the width of the media. 3. Load media in tray 1. Make sure that the top of the media is forward and the side to be printed on (rough side) is facing up. NOTE Transparencies can be printed from tray 2, but the printing speed is slower. Transparencies should not be printed from optional tray 3. 28 Chapter 5 Print tasks ENWW
-
 1
1 -
2
-
3
-
4
-
5
-
6
-
7
-
8
-
9
-
10
-
11
-
12
-
13
-
14
-
15
-
16
-
17
-
18
-
19
-
20
-
21
-
22
-
23
-
24
-
25
-
26
-
27
-
28
-
29
-
30
-
31
-
32
-
 33
33 -
 34
34 -
 35
35 -
 36
36 -
 37
37 -
 38
38 -
 39
39 -
 40
40 -
 41
41 -
 42
42 -
 43
43 -
44
-
45
-
46
-
47
-
48
-
49
-
50
-
51
-
52
-
53
-
54
-
55
-
56
-
57
-
58
-
59
-
60
-
61
-
62
-
63
-
64
-
65
-
66
-
67
-
68
-
69
-
70
-
71
-
72
-
73
-
74
-
75
-
76
-
77
-
78
-
79
-
80
-
81
-
82
-
83
-
84
-
85
-
86
-
87
-
88
-
89
-
90
-
91
-
92
-
93
-
94
-
95
-
96
-
97
-
98
-
99
-
100
-
101
-
102
-
103
-
104
-
105
-
106
-
107
-
108
-
109
-
110
-
111
-
112
-
113
-
114
-
115
-
116
-
117
-
118
-
119
-
120
-
121
-
122
-
123
-
124
-
125
-
126
-
127
-
128
-
129
-
130
-
131
-
132
-
133
-
134
-
135
-
136
-
137
-
138
-
139
-
140
-
141
-
142
-
143
-
144
-
145
-
146
-
147
-
148
-
149
-
150
-
151
-
152
-
153
-
154
-
155
-
156
-
157
-
158
 |
 |
