HP PageWide XL 4000 User Guide - Page 26
Con firmware updates, Con a scan-to-network or scan-to-FTP folder (MFP only
 |
View all HP PageWide XL 4000 manuals
Add to My Manuals
Save this manual to your list of manuals |
Page 26 highlights
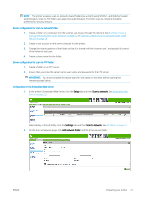
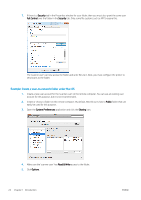
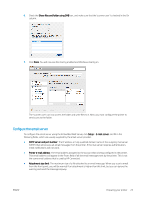
To configure the email printing configuration, tap , then , which will display your printer's unique printer code and the email address that can be used to send jobs to the printer. You must also visit http://www.hpconnected.com to register yourself and your printer (using the printer code). Tap in the top right corner of the HP Connected screen to access the following options: ● HP Connected Connectivity menu: You can enable or disable HP Connected for this printer, or completely remove it from the HP Connected service. ● Printer code: You can view or renew the printer code. ● Email address: You can view the printer's email address. ● HP Connected jobs: You can decide whether jobs received by email should be printed directly (the default option) or put on hold in the job queue. ● Restore HP Connected settings: You can restore HP Connected settings to their default values. Configure firmware updates You can choose from the Embedded Web Server or from the front panel whether and how to download firmware updates. NOTE: If an administrator password has been set, it will be required to change these settings. ● In the Embedded Web Server: click Setup > Firmware update. ● Using the front panel: tap , then , then . The following settings are available: ● Check: If you select Automatically (the default setting), the printer will check automatically every week (or after the printer has been restarted seven times, whichever happens first) whether new firmware is available. If you select Manually, the printer will not check automatically; you can check manually whenever you like. ● Download: If you select Automatically (the default setting), the printer will automatically download new firmware whenever it becomes available. If you select Manually, you will be asked to approve each download. NOTE: Downloading the firmware does not mean that you have installed it in your printer. To install the new firmware, you must confirm the installation manually. ● Firmware update history: A list of firmware versions that have been installed in the printer. It is usually possible to reinstall the version immediately before the version that is currently installed, if you have some problem with the current version. Configure a scan-to-network or scan-to-FTP folder (MFP only) A scanned image may be saved in a USB flash drive, in a network folder, or in an FTP folder. The USB flash drive option requires no preparation, but the other options will not work until they have been set up in the following way. 20 Chapter 1 Introduction ENWW
-
 1
1 -
2
-
3
-
4
-
5
-
6
-
7
-
8
-
9
-
10
-
11
-
12
-
13
-
14
-
15
-
16
-
17
-
18
-
19
-
20
-
 21
21 -
 22
22 -
 23
23 -
 24
24 -
 25
25 -
 26
26 -
 27
27 -
 28
28 -
 29
29 -
 30
30 -
 31
31 -
32
-
33
-
34
-
35
-
36
-
37
-
38
-
39
-
40
-
41
-
42
-
43
-
44
-
45
-
46
-
47
-
48
-
49
-
50
-
51
-
52
-
53
-
54
-
55
-
56
-
57
-
58
-
59
-
60
-
61
-
62
-
63
-
64
-
65
-
66
-
67
-
68
-
69
-
70
-
71
-
72
-
73
-
74
-
75
-
76
-
77
-
78
-
79
-
80
-
81
-
82
-
83
-
84
-
85
-
86
-
87
-
88
-
89
-
90
-
91
-
92
-
93
-
94
-
95
-
96
-
97
-
98
-
99
-
100
-
101
-
102
-
103
-
104
-
105
-
106
-
107
-
108
-
109
-
110
-
111
-
112
-
113
-
114
-
115
-
116
-
117
-
118
-
119
-
120
-
121
-
122
-
123
-
124
-
125
-
126
-
127
-
128
-
129
-
130
-
131
-
132
-
133
-
134
-
135
-
136
-
137
-
138
-
139
-
140
-
141
-
142
-
143
-
144
-
145
-
146
-
147
-
148
-
149
-
150
-
151
-
152
-
153
-
154
-
155
-
156
-
157
-
158
-
159
-
160
-
161
-
162
-
163
-
164
-
165
-
166
-
167
-
168
-
169
-
170
-
171
-
172
-
173
-
174
-
175
-
176
-
177
-
178
-
179
-
180
-
181
-
182
-
183
-
184
-
185
-
186
-
187
-
188
-
189
-
190
-
191
-
192
-
193
 |
 |
