HP Pavilion dm1-4000 User Guide HP Notebook - Windows 7 - Page 70
Using HP 3D DriveGuard software, Adding or replacing a hard drive, Removing the hard drive
 |
View all HP Pavilion dm1-4000 manuals
Add to My Manuals
Save this manual to your list of manuals |
Page 70 highlights
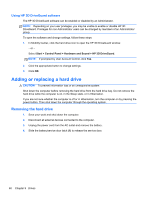
Using HP 3D DriveGuard software The HP 3D DriveGuard software can be enabled or disabled by an Administrator. NOTE: Depending on your user privileges, you may be unable to enable or disable HP 3D DriveGuard. Privileges for non-Administrator users can be changed by members of an Administrator group. To open the software and change settings, follow these steps: 1. In Mobility Center, click the hard drive icon to open the HP 3D DriveGuard window. - or - Select Start > Control Panel > Hardware and Sound > HP 3D DriveGuard. NOTE: If prompted by User Account Control, click Yes. 2. Click the appropriate button to change settings. 3. Click OK. Adding or replacing a hard drive CAUTION: To prevent information loss or an unresponsive system: Shut down the computer before removing the hard drive from the hard drive bay. Do not remove the hard drive while the computer is on, in the Sleep state, or in Hibernation. If you are not sure whether the computer is off or in Hibernation, turn the computer on by pressing the power button. Then shut down the computer through the operating system. Removing the hard drive 1. Save your work and shut down the computer. 2. Disconnect all external devices connected to the computer. 3. Unplug the power cord from the AC outlet and remove the battery. 4. Slide the battery/service door latch (1) to release the service door. 60 Chapter 9 Drives
-
 1
1 -
2
-
3
-
4
-
5
-
6
-
7
-
8
-
9
-
10
-
11
-
12
-
13
-
14
-
15
-
16
-
17
-
18
-
19
-
20
-
21
-
22
-
23
-
24
-
25
-
26
-
27
-
28
-
29
-
30
-
31
-
32
-
33
-
34
-
35
-
36
-
37
-
38
-
39
-
40
-
41
-
42
-
43
-
44
-
45
-
46
-
47
-
48
-
49
-
50
-
51
-
52
-
53
-
54
-
55
-
56
-
57
-
58
-
59
-
60
-
61
-
62
-
63
-
64
-
 65
65 -
 66
66 -
 67
67 -
 68
68 -
 69
69 -
 70
70 -
 71
71 -
 72
72 -
 73
73 -
 74
74 -
 75
75 -
76
-
77
-
78
-
79
-
80
-
81
-
82
-
83
-
84
-
85
-
86
-
87
-
88
-
89
-
90
-
91
-
92
-
93
-
94
-
95
-
96
-
97
-
98
-
99
-
100
-
101
-
102
-
103
-
104
-
105
-
106
-
107
-
108
-
109
 |
 |