HP Pavilion g6-1300 HP Pavilion G6 Notebook PC Maintenance and Service Guide - Page 59
Remove the hard drive, and the cover
 |
View all HP Pavilion g6-1300 manuals
Add to My Manuals
Save this manual to your list of manuals |
Page 59 highlights
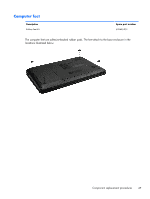
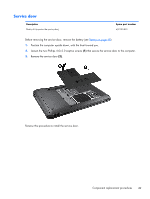
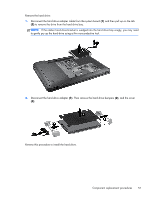
Remove the hard drive: 1. Disconnect the hard drive adapter cable from the system board (1) and then pull up on the tab (2) to remove the drive from the hard drive bay. NOTE: If the rubber hard drive bracket is wedged into the hard drive bay snugly, you may need to gently pry up the hard drive using a thin nonconductive tool. 2. Disconnect the hard drive adapter (1). Then remove the hard drive bumpers (2), and the cover (3). Reverse this procedure to install the hard drive. Component replacement procedures 51
-
 1
1 -
2
-
3
-
4
-
5
-
6
-
7
-
8
-
9
-
10
-
11
-
12
-
13
-
14
-
15
-
16
-
17
-
18
-
19
-
20
-
21
-
22
-
23
-
24
-
25
-
26
-
27
-
28
-
29
-
30
-
31
-
32
-
33
-
34
-
35
-
36
-
37
-
38
-
39
-
40
-
41
-
42
-
43
-
44
-
45
-
46
-
47
-
48
-
49
-
50
-
51
-
52
-
53
-
 54
54 -
 55
55 -
 56
56 -
 57
57 -
 58
58 -
 59
59 -
 60
60 -
 61
61 -
 62
62 -
 63
63 -
 64
64 -
65
-
66
-
67
-
68
-
69
-
70
-
71
-
72
-
73
-
74
-
75
-
76
-
77
-
78
-
79
-
80
-
81
-
82
-
83
-
84
-
85
-
86
-
87
-
88
-
89
-
90
-
91
-
92
-
93
-
94
-
95
-
96
-
97
-
98
-
99
-
100
-
101
-
102
-
103
-
104
-
105
-
106
-
107
-
108
-
109
-
110
-
111
-
112
-
113
-
114
-
115
-
116
-
117
-
118
-
119
-
120
-
121
 |
 |
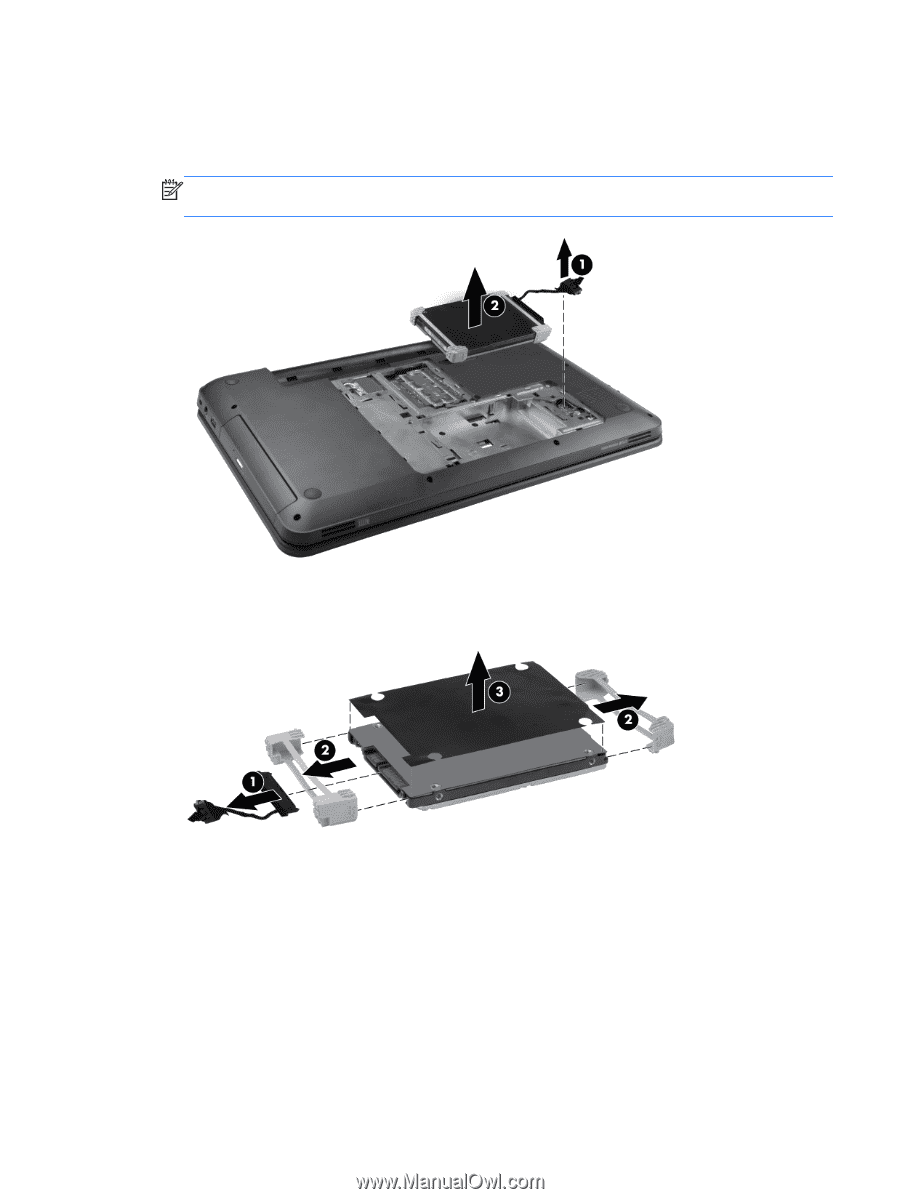
Remove the hard drive:
1.
Disconnect the hard drive adapter cable from the system board
(1)
and then pull up on the tab
(2)
to remove the drive from the hard drive bay.
NOTE:
If the rubber hard drive bracket is wedged into the hard drive bay snugly, you may need
to gently pry up the hard drive using a thin nonconductive tool.
2.
Disconnect the hard drive adapter
(1)
. Then remove the hard drive bumpers
(2)
, and the cover
(3)
.
Reverse this procedure to install the hard drive.
Component replacement procedures
51