HP Pavilion g6-1300 HP Pavilion G6 Notebook PC Maintenance and Service Guide - Page 70
Remove the top cover
 |
View all HP Pavilion g6-1300 manuals
Add to My Manuals
Save this manual to your list of manuals |
Page 70 highlights
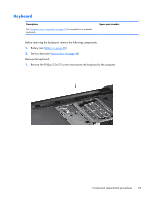
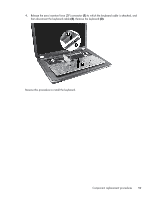
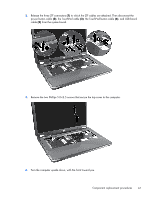
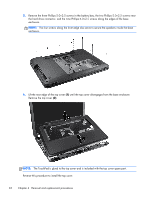
5. Remove the three Phillips 5.0×2.5 screws in the battery bay, the two Phillips 5.0×2.5 screws near the hard drive connector, and the nine Phillips 6.0×2.5 screws along the edges of the base enclosure. NOTE: The four screws along the front edge also serve to secure the speakers inside the base enclosure. 6. Lift the rear edge of the top cover (1) until the top cover disengages from the base enclosure. Remove the top cover (2). NOTE: The TouchPad is glued to the top cover and is included with the top cover spare part. Reverse this procedure to install the top cover. 62 Chapter 4 Removal and replacement procedures
-
 1
1 -
2
-
3
-
4
-
5
-
6
-
7
-
8
-
9
-
10
-
11
-
12
-
13
-
14
-
15
-
16
-
17
-
18
-
19
-
20
-
21
-
22
-
23
-
24
-
25
-
26
-
27
-
28
-
29
-
30
-
31
-
32
-
33
-
34
-
35
-
36
-
37
-
38
-
39
-
40
-
41
-
42
-
43
-
44
-
45
-
46
-
47
-
48
-
49
-
50
-
51
-
52
-
53
-
54
-
55
-
56
-
57
-
58
-
59
-
60
-
61
-
62
-
63
-
64
-
 65
65 -
 66
66 -
 67
67 -
 68
68 -
 69
69 -
 70
70 -
 71
71 -
 72
72 -
 73
73 -
 74
74 -
 75
75 -
76
-
77
-
78
-
79
-
80
-
81
-
82
-
83
-
84
-
85
-
86
-
87
-
88
-
89
-
90
-
91
-
92
-
93
-
94
-
95
-
96
-
97
-
98
-
99
-
100
-
101
-
102
-
103
-
104
-
105
-
106
-
107
-
108
-
109
-
110
-
111
-
112
-
113
-
114
-
115
-
116
-
117
-
118
-
119
-
120
-
121
 |
 |

5.
Remove the three Phillips 5.0×2.5 screws in the battery bay, the two Phillips 5.0×2.5 screws near
the hard drive connector, and the nine Phillips 6.0×2.5 screws along the edges of the base
enclosure.
NOTE:
The four screws along the front edge also serve to secure the speakers inside the base
enclosure.
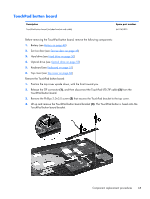
6.
Lift the rear edge of the top cover
(1)
until the top cover disengages from the base enclosure.
Remove the top cover
(2)
.
NOTE:
The TouchPad is glued to the top cover and is included with the top cover spare part.
Reverse this procedure to install the top cover.
62
Chapter 4
Removal and replacement procedures