HP Pavilion x360 - 13-a155cl HP Pavilion x360 Convertible PC - Maintenance and - Page 49
If it is necessary to replace the display panel or any of the display assembly internal
 |
View all HP Pavilion x360 - 13-a155cl manuals
Add to My Manuals
Save this manual to your list of manuals |
Page 49 highlights
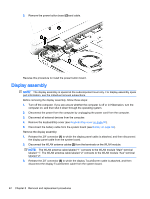
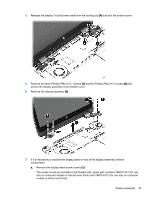
4. Release the display TouchScreen cable from the routing clip (4) built into the bottom cover. 5. Remove the three Phillips PM2.5×5.7 screws (1) and the Phillips PM2.5×3.3 screw (2) that secure the display assembly to the bottom cover. 6. Remove the display assembly (3). 7. If it is necessary to replace the display panel or any of the display assembly internal components: a. Remove the display bezel screw covers (1). The screw covers are included in the Rubber Kits, spare part numbers 768019-001 (for use only on computer models in natural silver finish) and 768018-001 (for use only on computer models in vibrant red finish). Display assembly 43
-
 1
1 -
2
-
3
-
4
-
5
-
6
-
7
-
8
-
9
-
10
-
11
-
12
-
13
-
14
-
15
-
16
-
17
-
18
-
19
-
20
-
21
-
22
-
23
-
24
-
25
-
26
-
27
-
28
-
29
-
30
-
31
-
32
-
33
-
34
-
35
-
36
-
37
-
38
-
39
-
40
-
41
-
42
-
43
-
 44
44 -
 45
45 -
 46
46 -
 47
47 -
 48
48 -
 49
49 -
 50
50 -
 51
51 -
 52
52 -
 53
53 -
 54
54 -
55
-
56
-
57
-
58
-
59
-
60
-
61
-
62
-
63
-
64
-
65
-
66
-
67
-
68
-
69
-
70
-
71
-
72
-
73
-
74
-
75
-
76
 |
 |
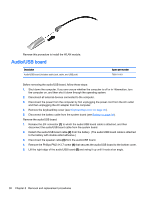
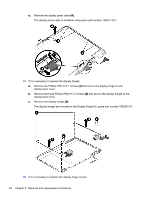
4.
Release the display TouchScreen cable from the routing clip
(4)
built into the bottom cover.
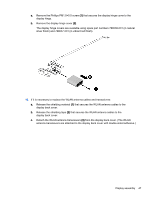
5.
Remove the three Phillips PM2.5×5.7 screws
(1)
and the Phillips PM2.5×3.3 screw
(2)
that
secure the display assembly to the bottom cover.
6.
Remove the display assembly
(3)
.
7.
If it is necessary to replace the display panel or any of the display assembly internal
components:
a.
Remove the display bezel screw covers
(1)
.
The screw covers are included in the Rubber Kits, spare part numbers 768019-001 (for use
only on computer models in natural silver finish) and 768018-001 (for use only on computer
models in vibrant red finish).
Display assembly
43