HP Photosmart 612 HP Photosmart 612 digital camera - (English) User Guide - Page 15
Taking pictures - review
 |
View all HP Photosmart 612 manuals
Add to My Manuals
Save this manual to your list of manuals |
Page 15 highlights
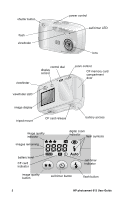
2 Taking pictures This chapter describes the basic process of taking pictures with your digital camera and gives you tips for taking the best pictures. When you are familiar with this process, you can use the advanced camera functions described in later chapters. Note If the camera is on, you can take a picture anytime, even if the image display is off or shows a menu. Taking a picture 1 Turn on the camera. 2 Frame your subject in the viewfinder. 3 Adjust the zoom by pressing the ends of the ZOOM ( ) control until the subject is positioned as you desire. Press and hold the SHUTTER button halfway down to allow the camera to adjust the focus and exposure. 4 When you see the green light to the left of the viewfinder, press the SHUTTER button all the way down. 5 The image display on the back of the camera turns on and displays the image for a short time. To preserve battery power, the image display turns off after the image has been saved to memory. To review all the pictures you have taken, press the dial. Tip When you are taking a picture, be careful to keep your fingers away from the lens and the flash.. Taking pictures 7
-
 1
1 -
2
-
3
-
4
-
5
-
6
-
7
-
8
-
9
-
 10
10 -
 11
11 -
 12
12 -
 13
13 -
 14
14 -
 15
15 -
 16
16 -
 17
17 -
 18
18 -
 19
19 -
 20
20 -
21
-
22
-
23
-
24
-
25
-
26
-
27
-
28
-
29
-
30
-
31
-
32
-
33
-
34
-
35
-
36
-
37
-
38
-
39
-
40
-
41
-
42
-
43
-
44
-
45
-
46
-
47
-
48
-
49
-
50
-
51
-
52
-
53
-
54
-
55
-
56
-
57
-
58
-
59
-
60
-
61
-
62
-
63
-
64
-
65
-
66
-
67
-
68
-
69
-
70
-
71
-
72
-
73
-
74
-
75
-
76
-
77
-
78
-
79
-
80
-
81
-
82
-
83
-
84
 |
 |
