HP Photosmart A520 User Guide - Page 27
Delete photos and other files from a memory card, Enhance your photos, HP Real Life technology options - series software
 |
View all HP Photosmart A520 manuals
Add to My Manuals
Save this manual to your list of manuals |
Page 27 highlights
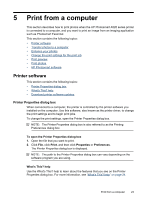
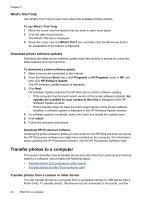
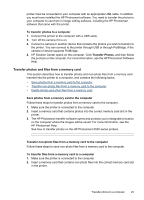
Chapter 5 3. Right-click the HP Digital Imaging Monitor icon in the Windows taskbar, and select HP Photosmart A520 series > Open E. NOTE: E may not be the drive letter the computer assigns. Windows Explorer opens and shows the contents of the card. 4. Drag and drop files from the memory card to a location on the computer. NOTE: You can also use Windows Explorer to copy files from the computer to the memory card. Delete photos and other files from a memory card Follow these steps to delete photos and other files from a memory card. To delete photos or files from a memory card 1. Make sure the printer is connected to the computer. 2. Insert a memory card that contains files into the correct memory card slot in the printer. 3. Right-click the HP Digital Imaging Monitor icon in the Windows taskbar, and select HP Photosmart A520 series > Open E. NOTE: E may not be the drive letter the computer assigns. Windows Explorer opens and shows the contents of the card. 4. Select the files you want to delete, then select File > Delete. Enhance your photos The printer software offers several features to make printing digital photos easier and to improve photo quality: • Use the HP Real Life technology options to touch up photos. For more information, see "HP Real Life technology options" on page 26. • Achieve the highest resolution with Maximum dpi. For more information, see "Maximum dpi" on page 27. Learn how to add professional touches to digital photographs: • Use "advanced color settings" on page 29 to improve printed colors. • Print black and white photos. For more information, see "Print black and white photos" on page 34. • Use HP Advanced Photo Paper for easy to handle, sturdy, glossy photo paper with an instant-dry finish resistant to water, smears, fingerprints and humidity. For more information, see "Choose the best paper for the job" on page 15. HP Real Life technology options HP Real Life technologies enhance the quality of your printed photos. In most cases, you do not need to change the Basic default print setting. The Basic setting sharpens the images that you print, and improves the quality and clarity of low resolution images, such as those downloaded from the Internet. 26 Print from a computer
-
 1
1 -
2
-
3
-
4
-
5
-
6
-
7
-
8
-
9
-
10
-
11
-
12
-
13
-
14
-
15
-
16
-
17
-
18
-
19
-
20
-
21
-
 22
22 -
 23
23 -
 24
24 -
 25
25 -
 26
26 -
 27
27 -
 28
28 -
 29
29 -
 30
30 -
 31
31 -
 32
32 -
33
-
34
-
35
-
36
-
37
-
38
-
39
-
40
-
41
-
42
-
43
-
44
-
45
-
46
-
47
-
48
-
49
-
50
-
51
-
52
-
53
-
54
-
55
-
56
-
57
-
58
-
59
-
60
-
61
-
62
-
63
-
64
-
65
-
66
-
67
-
68
-
69
-
70
-
71
-
72
 |
 |