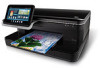
HP Photosmart eStation All-in-One Printer - C510 User Guide - Page 39
HP Photosmart eStation C510 series - Send and Receive Faxes with the eFax® Brand Online Fax Service - photosmart estation all in photosmart estation e all in one printer series
 |
View all HP Photosmart eStation All-in-One Printer - C510 manuals
Add to My Manuals
Save this manual to your list of manuals |
Page 39 highlights
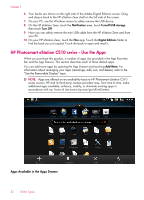
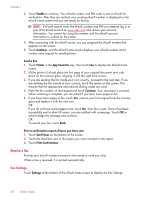
HP Photosmart eStation C510 series - Send and Receive Faxes with the eFax® Brand Online Fax Service The HP Photosmart eStation C510 series printer faxes without a phone line. The printer sends and receives faxes using eFax®, a web-based faxing service. This service is free when you send up to 20 pages and receive up to 20 pages per month. If you want to send or receive more pages per month, you can upgrade to the eFax Plus® service, and your account is charged a monthly fee. When you use eFax®, your document is scanned by the printer, sent wirelessly to eFax's® server, and then on to the receiving fax number. To use the eFax® brand service, the printer must have an internet connection and Web Services must be enabled so the printer can communicate with eFax's® server. Before you can use eFax® with your printer, you must perform the simple setup procedures described below. This one-time setup allows the printer to communicate with eFax's® server using your eFax® account information whenever you send and receive faxes. Click here for more information about eFax®. Set up the printer for faxing (required). Register with eFax® 1. Touch Printer in the App Favorites tray, then touch Fax to display the eFax® home screen. 2. Touch Register, then touch the Web Services checkbox to enable Web Services. Create an account by following the onscreen instructions. 3. Touch Terms and Conditions to read the eFax® brand services agreement, then touch the I agree checkbox and click OK. 4. After connecting with the eFax® server, you are assigned the eFax® number that appears on the screen. Touch Continue, and the eFax® home screen displays your eFax® number and a number entry keypad for sending faxes. NOTE: Although the area code may not be local to you, you do not incur any long distance charges when sending and receiving faxes with this number. Set up your printer with an existing eFax® number 1. Touch Printer in the App Favorites tray, then touch Fax to display the eFax® home screen. Enter your existing eFax® number in the area indicated below Already have an eFax® number? 2. Enter the personal identification number (PIN) code for this account. NOTE: If you've forgotten your PIN, touch the indicated area to have it sent to the email address associated with your eFax® number. HP Photosmart eStation C510 series - Send and Receive Faxes with the eFax® Brand Online Fax 37 Service
-
 1
1 -
2
-
3
-
4
-
5
-
6
-
7
-
8
-
9
-
10
-
11
-
12
-
13
-
14
-
15
-
16
-
17
-
18
-
19
-
20
-
21
-
22
-
23
-
24
-
25
-
26
-
27
-
28
-
29
-
30
-
31
-
32
-
33
-
 34
34 -
 35
35 -
 36
36 -
 37
37 -
 38
38 -
 39
39 -
 40
40 -
 41
41 -
 42
42 -
 43
43 -
 44
44 -
45
-
46
-
47
-
48
-
49
-
50
-
51
-
52
-
53
-
54
-
55
-
56
-
57
-
58
-
59
-
60
-
61
-
62
-
63
-
64
-
65
-
66
-
67
-
68
-
69
-
70
-
71
-
72
 |
 |
