HP Presario SG3500 PC Troubleshooting - Page 5
Maintenance, Creating Data Backup Discs, Creating System Recovery Discs
 |
View all HP Presario SG3500 manuals
Add to My Manuals
Save this manual to your list of manuals |
Page 5 highlights
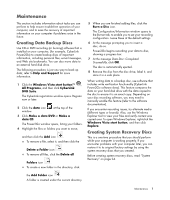
Maintenance This section includes information about tasks you can perform to help ensure trouble-free operation of your computer, and to ease the recovery of important information on your computer if problems arise in the future. Creating Data Backup Discs Use CD or DVD recording (or burning) software that is installed on your computer, (for example, CyberLink Power2Go) to create backup discs of important information, including personal files, e-mail messages, and Web site bookmarks. You can also move data to an external hard disk drive. The following procedure is just one way to back up data; refer to Help and Support for more information. 1 Click the Windows Vista start button™ , All Programs, and then click CyberLink DVD Suite. The CyberLink registration window opens. Register now or later. 2 Click the data icon window. at the top of the 3 Click Make a data DVD or Make a data CD. The Power2Go window opens, listing your folders. 4 Highlight the files or folders you want to move, and then click the Add icon . To remove a file, select it, and then click the Delete a Folder icon . To remove all files, click the Delete all Folders icon . To create a new folder in the directory, click 5 When you are finished adding files, click the Burn a Disc icon. The Configuration/Information window opens to the Burner tab, to enable you to set your recording configuration. Leave these at the default settings. 6 At the message prompting you to insert a disc, do so. Power2Go begins recording your data to disc, showing a progress bar. 7 At the message Data Disc: Completed Successfully, click OK. The disc is automatically ejected. 8 Remove the disc from the disc drive, label it, and store it in a safe place. When writing data to a backup disc, use software that includes write verification functionality (CyberLink Power2Go software does). This feature compares the data on your hard disk drive with the data copied to the disc to ensure it is an exact copy. Depending on your disc recording software, you may need to manually enable this feature (refer to the software documentation). If you encounter recording issues, try alternate media (different types or brands). Also, use the Windows Explorer tool to view your files and verify content was copied over. To open Windows Explorer, right-click the Windows Vista start button, and then click Explore. Creating System Recovery Discs This is a one-time procedure that you should perform while your computer is working properly. If you encounter problems with your computer later, you can restore it to its original factory settings by using the system recovery discs that you created. Before creating system recovery discs, read "System Recovery" on page 24. the Add Folder icon . A folder is created under the current directory. Maintenance 1
-
 1
1 -
 2
2 -
 3
3 -
 4
4 -
 5
5 -
 6
6 -
 7
7 -
 8
8 -
 9
9 -
 10
10 -
 11
11 -
12
-
13
-
14
-
15
-
16
-
17
-
18
-
19
-
20
-
21
-
22
-
23
-
24
-
25
-
26
-
27
-
28
-
29
-
30
-
31
-
32
 |
 |
