HP ProBook 5320m HP ProBook 5320m Notebook PC Maintenance and Service Guide - Page 56
Grasp the edge of the memory module, and then pull it out of the memory module slot.
 |
View all HP ProBook 5320m manuals
Add to My Manuals
Save this manual to your list of manuals |
Page 56 highlights
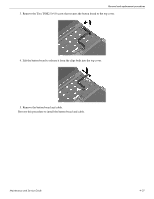
Removal and replacement procedures Ä CAUTION: To prevent damage to the memory module, hold it by the edges only. Do not touch the components on the memory module. 2. Grasp the edge of the memory module, and then pull it out of the memory module slot. ✎ Memory modules are designed with a notch to prevent incorrect insertion into the memory module slot. Reverse this procedure to install a memory module. 4-22 Maintenance and Service Guide
-
 1
1 -
2
-
3
-
4
-
5
-
6
-
7
-
8
-
9
-
10
-
11
-
12
-
13
-
14
-
15
-
16
-
17
-
18
-
19
-
20
-
21
-
22
-
23
-
24
-
25
-
26
-
27
-
28
-
29
-
30
-
31
-
32
-
33
-
34
-
35
-
36
-
37
-
38
-
39
-
40
-
41
-
42
-
43
-
44
-
45
-
46
-
47
-
48
-
49
-
50
-
 51
51 -
 52
52 -
 53
53 -
 54
54 -
 55
55 -
 56
56 -
 57
57 -
 58
58 -
 59
59 -
 60
60 -
 61
61 -
62
-
63
-
64
-
65
-
66
-
67
-
68
-
69
-
70
-
71
-
72
-
73
-
74
-
75
-
76
-
77
-
78
-
79
-
80
-
81
-
82
-
83
-
84
-
85
-
86
-
87
-
88
-
89
-
90
-
91
-
92
-
93
-
94
-
95
-
96
-
97
-
98
-
99
-
100
-
101
-
102
-
103
-
104
-
105
-
106
-
107
-
108
-
109
-
110
-
111
-
112
-
113
-
114
-
115
-
116
-
117
-
118
-
119
-
120
-
121
-
122
-
123
-
124
-
125
-
126
-
127
-
128
-
129
-
130
-
131
-
132
-
133
 |
 |

4–22
Maintenance and Service Guide
Removal and replacement procedures
Ä
CAUTION:
To prevent damage to the memory module, hold it by the edges only. Do not touch the components on the memory
module.
2. Grasp the edge of the memory module, and then pull it out of the memory module slot.
✎
Memory modules are designed with a notch to prevent incorrect insertion into the memory module slot.
Reverse this procedure to install a memory module.