HP ProLiant SL4545 HP ProLiant SL4500 Series Chassis Maintenance and Service G - Page 44
Drive backplane
 |
View all HP ProLiant SL4545 manuals
Add to My Manuals
Save this manual to your list of manuals |
Page 44 highlights
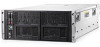
CAUTION: To prevent improper cooling and thermal damage, do not operate the node or the enclosure unless all drive and device bays are populated with either a component or a blank. To install the component: 1. Prepare the drive. IMPORTANT: The 1 node chassis supports up to 30 drives per drive backplane. The 2 node chassis supports up to 25 drives per drive backplane. Always populate drive bays from the rear to the front starting with the highest device bay ID number. All unpopulated drive bays require drive blanks to properly distribute air flow and cool the installed drives. 2. Install the drive. Determine the status of the drive from the drive LED definitions ("Drive display LEDs" on page 65). Drive backplane To remove the component: 1. Power down the nodes ("Power down the node" on page 30). Removal and replacement procedures 44
-
 1
1 -
2
-
3
-
4
-
5
-
6
-
7
-
8
-
9
-
10
-
11
-
12
-
13
-
14
-
15
-
16
-
17
-
18
-
19
-
20
-
21
-
22
-
23
-
24
-
25
-
26
-
27
-
28
-
29
-
30
-
31
-
32
-
33
-
34
-
35
-
36
-
37
-
38
-
 39
39 -
 40
40 -
 41
41 -
 42
42 -
 43
43 -
 44
44 -
 45
45 -
 46
46 -
 47
47 -
 48
48 -
 49
49 -
50
-
51
-
52
-
53
-
54
-
55
-
56
-
57
-
58
-
59
-
60
-
61
-
62
-
63
-
64
-
65
-
66
-
67
-
68
-
69
-
70
-
71
-
72
-
73
-
74
-
75
-
76
-
77
 |
 |
