HP ProLiant SL4545 HP ProLiant SL4500 Series Chassis Maintenance and Service G - Page 60
remove the adapter rails., To replace the component, reverse the removal procedure.
 |
View all HP ProLiant SL4545 manuals
Add to My Manuals
Save this manual to your list of manuals |
Page 60 highlights
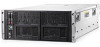
3. On the front of the rack, remove the two screws from each of the mounting brackets, and then remove the brackets. 4. Remove the four flathead screws, marked number 2, that secure the adapter rails to the rack, and then remove the adapter rails. To replace the component, reverse the removal procedure. Removal and replacement procedures 60
-
 1
1 -
2
-
3
-
4
-
5
-
6
-
7
-
8
-
9
-
10
-
11
-
12
-
13
-
14
-
15
-
16
-
17
-
18
-
19
-
20
-
21
-
22
-
23
-
24
-
25
-
26
-
27
-
28
-
29
-
30
-
31
-
32
-
33
-
34
-
35
-
36
-
37
-
38
-
39
-
40
-
41
-
42
-
43
-
44
-
45
-
46
-
47
-
48
-
49
-
50
-
51
-
52
-
53
-
54
-
 55
55 -
 56
56 -
 57
57 -
 58
58 -
 59
59 -
 60
60 -
 61
61 -
 62
62 -
 63
63 -
 64
64 -
 65
65 -
66
-
67
-
68
-
69
-
70
-
71
-
72
-
73
-
74
-
75
-
76
-
77
 |
 |

Removal and replacement procedures
60
3.
On the front of the rack, remove the two screws from each of the mounting brackets, and then remove
the brackets.
4.
Remove the four flathead screws, marked number 2, that secure the adapter rails to the rack, and then
remove the adapter rails.
To replace the component, reverse the removal procedure.