HP Q1581A HP StorageWorks DAT SCSI Tape Drives user guide (Q1573 - 90905, Febr - Page 24
Install drive and connect power cable, Attach power and SCSI cables, Installing tape drive
 |
UPC - 882780612716
View all HP Q1581A manuals
Add to My Manuals
Save this manual to your list of manuals |
Page 24 highlights
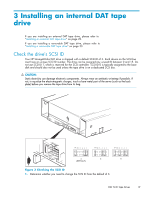
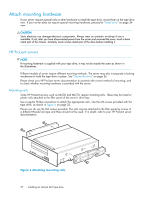
Install drive and connect power cable Slide the tape drive into the open bay, aligning the tray or rails with the slots in the bay, as shown in Figure 8 on page 24. Figure 8 Installing tape drive If your server does not use mounting hardware, check that the holes in the chassis are aligned with the holes in the side of the tape drive. Do not secure the drive at this point because you may have to move the drive to get the cables into place. Attach power and SCSI cables To support the high performance of the tape drive it is important that you connect to a recommended SCSI bus and use a suitably-rated SCSI cable, see "Why is the SCSI bus type important?" on page 14. 1. Check your server or HBA documentation to ensure that the SCSI bus and cabling supports up to Ultra160 bus speeds. We recommend that you attach the SCSI ribbon cable supplied with the tape drive to the SCSI host bus adapter. 2. Attach a spare power cable from the server's internal power supply to the power connector, as shown in Figure 9 on page 25. 3. Attach a spare connector on the server's built-in SCSI bus or HBA's SCSI ribbon cable to the SCSI connector of the drive, as shown in Figure 9 on page 25. 4. If the drive is the last device on the SCSI chain, make sure that the SCSI cable is terminated correctly. 24 Installing an internal DAT tape drive
-
 1
1 -
2
-
3
-
4
-
5
-
6
-
7
-
8
-
9
-
10
-
11
-
12
-
13
-
14
-
15
-
16
-
17
-
18
-
 19
19 -
 20
20 -
 21
21 -
 22
22 -
 23
23 -
 24
24 -
 25
25 -
 26
26 -
 27
27 -
 28
28 -
 29
29 -
30
-
31
-
32
-
33
-
34
-
35
-
36
-
37
-
38
-
39
-
40
-
41
-
42
-
43
-
44
-
45
-
46
-
47
-
48
-
49
-
50
-
51
-
52
-
53
-
54
-
55
-
56
-
57
-
58
-
59
-
60
-
61
-
62
-
63
-
64
-
65
-
66
-
67
-
68
-
69
 |
 |
