HP SG3-200 Upgrading and Servicing Guide - Page 24
Removing or Installing an Add-In Card, Removing an Add-in Card
 |
View all HP SG3-200 manuals
Add to My Manuals
Save this manual to your list of manuals |
Page 24 highlights
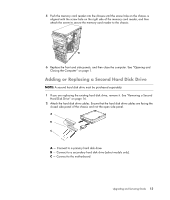
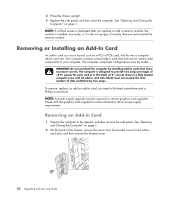
2 Place the chassis upright. 3 Replace the side panel, and then close the computer. See "Opening and Closing the Computer" on page 1. NOTE: If a blank screen is displayed after you replace or add a memory module, the module is installed incorrectly, or it is the wrong type of module. Remove and reinstall the memory module. Removing or Installing an Add-In Card An add-in card is a circuit board, such as a PCI or PCI-E card, that fits into a computer add-in card slot. Your computer contains several add-in card slots that can be used to add components to your computer. The computer component configurations vary by model. WARNING: Do not overload the computer by installing add-in cards that draw excessive current. The computer is designed to provide two amps (average) of +5 Vv power for each card in it. The total +5 Vv current draw in a fully loaded computer (one with all add-in card slots filled) must not exceed the total number of slots multiplied by two amps. To remove, replace, or add an add-in card, you need a flat-head screwdriver and a Phillips screwdriver. NOTE: A power supply upgrade may be required for certain graphics card upgrades. Check with the graphics card supplier for more information about power supply requirements. Removing an Add-in Card 1 Prepare the computer to be opened, and then remove the side panel. See "Opening and Closing the Computer" on page 1. 2 On the back of the chassis, remove the screw from the bracket cover for the add-in card slots, and then remove the bracket cover. 20 Upgrading and Servicing Guide
-
 1
1 -
2
-
3
-
4
-
5
-
6
-
7
-
8
-
9
-
10
-
11
-
12
-
13
-
14
-
15
-
16
-
17
-
18
-
 19
19 -
 20
20 -
 21
21 -
 22
22 -
 23
23 -
 24
24 -
 25
25 -
 26
26 -
 27
27 -
 28
28
 |
 |