HP StorageWorks 9000s NAS 4000s and 9000s Administration Guide - Page 153
Print Services, Configuring the Print Server
 |
View all HP StorageWorks 9000s manuals
Add to My Manuals
Save this manual to your list of manuals |
Page 153 highlights
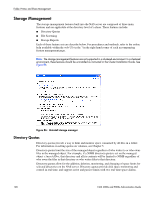
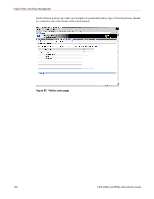
Folder, Printer, and Share Management Print Services Printer services are a new feature added to the NAS server that has not been available previously. The new service supports network printers only and is not intended for use with locally attached printers (USB or Parallel port connected). Note: See the Cluster Administration chapter for information on clustering a print spooler. If the NAS server is a part of an Active Directory domain vs Workgroup, the NAS server enables the following management features: ■ Restrict access to a printer based domain user accounts ■ Publish shared printers to Active Directory to aid in search for the resource Before adding a print server role the following check list of items should be followed: 1. Determine the operating system version of the clients that will send jobs to this printer. This information is used to select the correct client printer drivers for the client and server computers utilizing the printer. Enabling this role on the print server allows for the automatic distribution of these drivers to the clients. Additionally, the set of client operating systems determines which of these drivers need to be installed on the server during the print server role installation. 2. At the printer, print a configuration or test page that includes manufacturer, model, language, and installed options. This information is needed to choose the correct printer driver. The manufacturer and model are usually enough to uniquely identify the printer and its language. However, some printers support multiple languages, and the configuration printout usually lists them. Also, the configuration printout often lists installed options, such as extra memory, paper trays, envelope feeders, and duplex units. 3. Choose a printer name. Users running Windows-based client computers choose a printer by using the printer name. The wizard that you will use to configure your print server provides a default name, consisting of the printer manufacturer and model. The printer name is usually less than 31 characters in length. 4. Choose a share name. A user can connect to a shared printer by typing this name, or by selecting it from a list of share names. The share name is usually less than 8 characters in length for compatibility with MS-DOS and Windows 3.x clients. 5. (Optional) Choose a location description and a comment. These can help identify the location of the printer and provide additional information. For example, the location could be "Second floor, copy room" and the comment could be "Additional toner cartridges are available in the supply room on floor 1." Configuring the Print Server To set up a print server: 1. Click Start > Settings > Control Panel, double-click Administrative Tools, and then double-click Manage Your Server. 2. Click on Add or Remove a Roll. 3. A wizard will start. Click Next. 4. Select Printer Server from the list of Server Roles and click Next. 5. Select Windows 2000 and Windows XP clients only and click Next. NAS 4000s and 9000s Administration Guide 153
-
 1
1 -
2
-
3
-
4
-
5
-
6
-
7
-
8
-
9
-
10
-
11
-
12
-
13
-
14
-
15
-
16
-
17
-
18
-
19
-
20
-
21
-
22
-
23
-
24
-
25
-
26
-
27
-
28
-
29
-
30
-
31
-
32
-
33
-
34
-
35
-
36
-
37
-
38
-
39
-
40
-
41
-
42
-
43
-
44
-
45
-
46
-
47
-
48
-
49
-
50
-
51
-
52
-
53
-
54
-
55
-
56
-
57
-
58
-
59
-
60
-
61
-
62
-
63
-
64
-
65
-
66
-
67
-
68
-
69
-
70
-
71
-
72
-
73
-
74
-
75
-
76
-
77
-
78
-
79
-
80
-
81
-
82
-
83
-
84
-
85
-
86
-
87
-
88
-
89
-
90
-
91
-
92
-
93
-
94
-
95
-
96
-
97
-
98
-
99
-
100
-
101
-
102
-
103
-
104
-
105
-
106
-
107
-
108
-
109
-
110
-
111
-
112
-
113
-
114
-
115
-
116
-
117
-
118
-
119
-
120
-
121
-
122
-
123
-
124
-
125
-
126
-
127
-
128
-
129
-
130
-
131
-
132
-
133
-
134
-
135
-
136
-
137
-
138
-
139
-
140
-
141
-
142
-
143
-
144
-
145
-
146
-
147
-
 148
148 -
 149
149 -
 150
150 -
 151
151 -
 152
152 -
 153
153 -
 154
154 -
 155
155 -
 156
156 -
 157
157 -
 158
158 -
159
-
160
-
161
-
162
-
163
-
164
-
165
-
166
-
167
-
168
-
169
-
170
-
171
-
172
-
173
-
174
-
175
-
176
-
177
-
178
-
179
-
180
-
181
-
182
-
183
-
184
-
185
-
186
-
187
-
188
-
189
-
190
-
191
-
192
-
193
-
194
-
195
-
196
-
197
-
198
-
199
-
200
-
201
-
202
-
203
-
204
-
205
-
206
-
207
-
208
-
209
-
210
-
211
-
212
-
213
-
214
-
215
-
216
-
217
-
218
-
219
-
220
-
221
-
222
-
223
-
224
-
225
-
226
-
227
-
228
-
229
-
230
-
231
-
232
-
233
-
234
-
235
-
236
-
237
-
238
-
239
-
240
-
241
-
242
-
243
-
244
-
245
-
246
 |
 |