HP StorageWorks 9000s NAS 4000s and 9000s Administration Guide - Page 163
Server for NFS Authentication, Custom Installation
 |
View all HP StorageWorks 9000s manuals
Add to My Manuals
Save this manual to your list of manuals |
Page 163 highlights
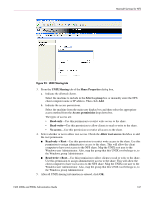
Microsoft Services for NFS Microsoft Services for Unix 3.0 CD has been included with the NAS server and is needed for the following procedure. To install the Authentication software on the domain controllers (CD Method): 1. Insert the Microsoft Windows Services for UNIX compact disc into the CD-ROM drive of the domain controller. 2. In the Microsoft Windows Services for UNIX Setup Wizard dialog box, click Next. 3. In the User name box, type your name. If the name of your organization does not appear in the Organization box, type the name of your organization there. 4. In the CD Key boxes, type the product key found on the back of the CD-ROM case, and then click Next. 5. Read the End User License Agreement carefully. If you accept the terms of the agreement, click I accept the terms in the License Agreement, and then click Next to continue installation. If you click I do not accept the License Agreement (Exit Setup), the installation procedure terminates. 6. Click Custom Installation, and then click Next. 7. In the Components pane, click the down arrow next to Windows Services for UNIX, and then click Entire component will not be available. 8. Click the plus sign (+) next to Authentication Tools. 9. In the Components pane, click the plus sign (+) next to Authentication Tools. 10. Click Server for NFS Authentication, click Will be installed on local hard drive, and then click Next. 11. Follow the remaining instructions in the Wizard. Note: NFS users can be authenticated using either Windows domain accounts or local accounts on the Windows server. Server for NFS Authentication must be installed on all domain controllers in the domain if NFS users will be authenticated using domain accounts. Server for NFS Authentication is always installed on the 9000s (or 4000s depending), which also runs the Server for NFS. NAS 4000s and 9000s Administration Guide 163
-
 1
1 -
2
-
3
-
4
-
5
-
6
-
7
-
8
-
9
-
10
-
11
-
12
-
13
-
14
-
15
-
16
-
17
-
18
-
19
-
20
-
21
-
22
-
23
-
24
-
25
-
26
-
27
-
28
-
29
-
30
-
31
-
32
-
33
-
34
-
35
-
36
-
37
-
38
-
39
-
40
-
41
-
42
-
43
-
44
-
45
-
46
-
47
-
48
-
49
-
50
-
51
-
52
-
53
-
54
-
55
-
56
-
57
-
58
-
59
-
60
-
61
-
62
-
63
-
64
-
65
-
66
-
67
-
68
-
69
-
70
-
71
-
72
-
73
-
74
-
75
-
76
-
77
-
78
-
79
-
80
-
81
-
82
-
83
-
84
-
85
-
86
-
87
-
88
-
89
-
90
-
91
-
92
-
93
-
94
-
95
-
96
-
97
-
98
-
99
-
100
-
101
-
102
-
103
-
104
-
105
-
106
-
107
-
108
-
109
-
110
-
111
-
112
-
113
-
114
-
115
-
116
-
117
-
118
-
119
-
120
-
121
-
122
-
123
-
124
-
125
-
126
-
127
-
128
-
129
-
130
-
131
-
132
-
133
-
134
-
135
-
136
-
137
-
138
-
139
-
140
-
141
-
142
-
143
-
144
-
145
-
146
-
147
-
148
-
149
-
150
-
151
-
152
-
153
-
154
-
155
-
156
-
157
-
 158
158 -
 159
159 -
 160
160 -
 161
161 -
 162
162 -
 163
163 -
 164
164 -
 165
165 -
 166
166 -
 167
167 -
 168
168 -
169
-
170
-
171
-
172
-
173
-
174
-
175
-
176
-
177
-
178
-
179
-
180
-
181
-
182
-
183
-
184
-
185
-
186
-
187
-
188
-
189
-
190
-
191
-
192
-
193
-
194
-
195
-
196
-
197
-
198
-
199
-
200
-
201
-
202
-
203
-
204
-
205
-
206
-
207
-
208
-
209
-
210
-
211
-
212
-
213
-
214
-
215
-
216
-
217
-
218
-
219
-
220
-
221
-
222
-
223
-
224
-
225
-
226
-
227
-
228
-
229
-
230
-
231
-
232
-
233
-
234
-
235
-
236
-
237
-
238
-
239
-
240
-
241
-
242
-
243
-
244
-
245
-
246
 |
 |
