HP StorageWorks 9000s NAS 4000s and 9000s Administration Guide - Page 37
Changing System Network Settings, Network
 |
View all HP StorageWorks 9000s manuals
Add to My Manuals
Save this manual to your list of manuals |
Page 37 highlights
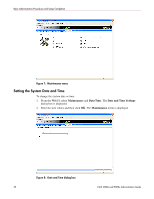
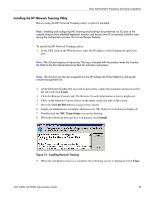
Basic Administrative Procedures and Setup Completion 3. Indicate the types of messages to be sent. ■ Critical alerts ■ Warning alerts ■ Informational alerts 4. Enter the desired e-mail address in the appropriate boxes. 5. After all settings have been entered, click OK. Changing System Network Settings Network properties are entered and managed from the Network menu. Most of these settings are entered as part of the Rapid Startup process. Settings made from this menu include adding the NAS server to a domain. Online help is available for these settings. Figure 12 is an illustration of the Network settings menu. Figure 12: Network menu NAS 4000s and 9000s Administration Guide 37
-
 1
1 -
2
-
3
-
4
-
5
-
6
-
7
-
8
-
9
-
10
-
11
-
12
-
13
-
14
-
15
-
16
-
17
-
18
-
19
-
20
-
21
-
22
-
23
-
24
-
25
-
26
-
27
-
28
-
29
-
30
-
31
-
 32
32 -
 33
33 -
 34
34 -
 35
35 -
 36
36 -
 37
37 -
 38
38 -
 39
39 -
 40
40 -
 41
41 -
 42
42 -
43
-
44
-
45
-
46
-
47
-
48
-
49
-
50
-
51
-
52
-
53
-
54
-
55
-
56
-
57
-
58
-
59
-
60
-
61
-
62
-
63
-
64
-
65
-
66
-
67
-
68
-
69
-
70
-
71
-
72
-
73
-
74
-
75
-
76
-
77
-
78
-
79
-
80
-
81
-
82
-
83
-
84
-
85
-
86
-
87
-
88
-
89
-
90
-
91
-
92
-
93
-
94
-
95
-
96
-
97
-
98
-
99
-
100
-
101
-
102
-
103
-
104
-
105
-
106
-
107
-
108
-
109
-
110
-
111
-
112
-
113
-
114
-
115
-
116
-
117
-
118
-
119
-
120
-
121
-
122
-
123
-
124
-
125
-
126
-
127
-
128
-
129
-
130
-
131
-
132
-
133
-
134
-
135
-
136
-
137
-
138
-
139
-
140
-
141
-
142
-
143
-
144
-
145
-
146
-
147
-
148
-
149
-
150
-
151
-
152
-
153
-
154
-
155
-
156
-
157
-
158
-
159
-
160
-
161
-
162
-
163
-
164
-
165
-
166
-
167
-
168
-
169
-
170
-
171
-
172
-
173
-
174
-
175
-
176
-
177
-
178
-
179
-
180
-
181
-
182
-
183
-
184
-
185
-
186
-
187
-
188
-
189
-
190
-
191
-
192
-
193
-
194
-
195
-
196
-
197
-
198
-
199
-
200
-
201
-
202
-
203
-
204
-
205
-
206
-
207
-
208
-
209
-
210
-
211
-
212
-
213
-
214
-
215
-
216
-
217
-
218
-
219
-
220
-
221
-
222
-
223
-
224
-
225
-
226
-
227
-
228
-
229
-
230
-
231
-
232
-
233
-
234
-
235
-
236
-
237
-
238
-
239
-
240
-
241
-
242
-
243
-
244
-
245
-
246
 |
 |
Basic Administrative Procedures and Setup Completion
37
NAS 4000s and 9000s Administration Guide
3.
Indicate the types of messages to be sent.
■
Critical alerts
■
Warning alerts
■
Informational alerts
4.
Enter the desired e-mail address in the appropriate boxes.
5.
After all settings have been entered, click
OK
.
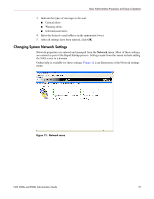
Changing System Network Settings
Network properties are entered and managed from the
Network
menu. Most of these settings
are entered as part of the Rapid Startup process. Settings made from this menu include adding
the NAS server to a domain.
Online help is available for these settings.
Figure 12
is an illustration of the Network settings
menu.
Figure 12:
Network menu