HP Thin Client PC t1000 T1500/T1510 Windows-based Terminal Client Manager Guid - Page 12
To install on a non-NT server, Start, Browse, Install.bat, Query, Manage the terminals via Tcl Script
 |
View all HP Thin Client PC t1000 manuals
Add to My Manuals
Save this manual to your list of manuals |
Page 12 highlights
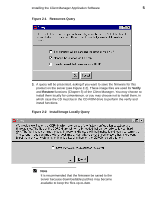
4 Chapter 2 Proceed as follows: 1. The first step depends upon the server on which you are installing the Client Manager: • To install on a non-NT server: a. Mount the CD-ROM drive and insert the installation CD into the drive. b. Change the directory to the CD mount point, and run the installation program (install). Note On a non-NT server the installation can be run in the X-Windows environment (GUI install) or as an interactive text-based installation. • To install on an NT server: Insert the installation CD into your server CD-ROM drive. After a few seconds the autostart feature will launch the installation program Note If the NT installation fails to start on its own, click on the Start menu button and select Run.... Use the Browse button to browse the CD and select the file Install.bat. Press OK to launch the installation software. 2. A series of dialog and message boxes will be displayed. Follow the prompts until a Query dialog box appears asking you to select the resources you wish to configure (see Figure 2-1). Select the Manage the terminals via Tcl Script check box. If you are installing the Client Manager as part of a server setup procedure, make other selections as instructed in the T1500/T1510 Window-Based Terminal Network Installation Guide. Press Ok to start the installation. A series of dialog boxes prompting you to make choices will follow, the particular ones depending on the software components selected. Note Only dialog boxes pertaining to the Client Manager are mentioned in the following instructions.
-
 1
1 -
2
-
3
-
4
-
5
-
6
-
 7
7 -
 8
8 -
 9
9 -
 10
10 -
 11
11 -
 12
12 -
 13
13 -
 14
14 -
 15
15 -
 16
16 -
 17
17 -
18
-
19
-
20
-
21
-
22
-
23
-
24
-
25
-
26
-
27
-
28
-
29
-
30
-
31
-
32
-
33
-
34
-
35
-
36
-
37
-
38
-
39
-
40
-
41
-
42
-
43
-
44
-
45
-
46
-
47
-
48
-
49
-
50
-
51
-
52
-
53
-
54
 |
 |