HP TouchSmart 310-1033 Upgrading and Servicing - Page 11
Removing and Replacing a Hard Disk Drive, on the cage.
 |
View all HP TouchSmart 310-1033 manuals
Add to My Manuals
Save this manual to your list of manuals |
Page 11 highlights
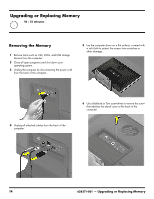
7 Remove the stand cover from the stand. 10 Lift the hard disk drive cage out of the computer. 8 The hard disk drive is underneath the stand cover. Use a #1 Phillips screwdriver to loosen the captive screw that secures the hard disk drive cage to the computer. This screw is not removed. 11 Use a #1 Phillips screwdriver to remove the four screws from bottom of the hard disk drive cage. Save the screws. 9 Use the metal handle on the hard-disk drive cage to slide the cage in the direction indicated by the arrow on the cage. 12 Slide the hard disk drive out of the cage. 628371-001 - Removing and Replacing a Hard Disk Drive 9
-
 1
1 -
2
-
3
-
4
-
5
-
 6
6 -
 7
7 -
 8
8 -
 9
9 -
 10
10 -
 11
11 -
 12
12 -
 13
13 -
 14
14 -
 15
15 -
 16
16 -
17
-
18
-
19
-
20
-
21
-
22
-
23
-
24
-
25
-
26
-
27
-
28
-
29
 |
 |

628371-001 — Removing and Replacing a Hard Disk Drive
9
7
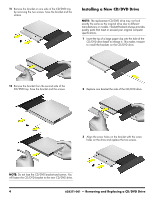
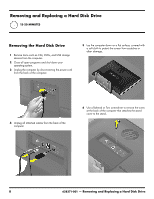
Remove the stand cover from the stand.
8
The hard disk drive is underneath the stand cover. Use
a #1 Phillips screwdriver to loosen the captive screw
that secures the hard disk drive cage to the computer
.
This screw is not removed.
9
Use the metal handle on the hard-disk drive cage to
slide the cage in the direction indicated by the arrow
on the cage.
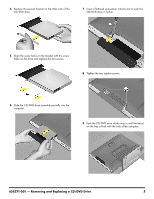
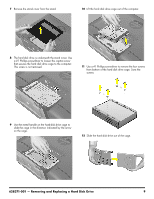
10
Lift the hard disk drive cage out of the computer.
11
Use a #1 Phillips screwdriver to remove the four screws
from bottom of the hard disk drive cage. Save the
screws.
12
Slide the hard disk drive out of the cage.