HP Vectra VEi8 HP Vectra VLi8, 3 COM Etherlink III ISA 10BT Card, Installatio - Page 32
If applicable, press OK to continue from NWLink IPX/SPX Protocol
 |
View all HP Vectra VEi8 manuals
Add to My Manuals
Save this manual to your list of manuals |
Page 32 highlights
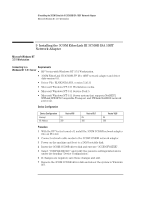
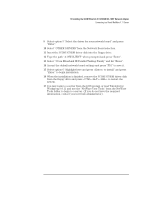
11 Installing the 3COM EtherLink III 3C509B ISA 10BT Network Adapter Connecting to a Novell NetWare 4.11 Server 8 Log onto Windows NT3.51 Workstation with administrator privileges (Contact your network administrator if you do not have the required information). 9 Open the "Network" icon in the "Control Panel" program group. 10 Click on "YES" in the "Network Settings" dialog box to install Windows NT Networking. 11 Insert the Windows NT 3.51Workstation CD in the CD-ROM drive. 12 Set the path to "D:\I386" (D:\ represents the CD-ROM drive with the Windows NT 3.51 CD) in the dialog-box of the Windows NT Setup window and click on "Continue". 13 Click on the "Do Not Detect" button from the "Network Adapter Card Detection" window, and click on the "Continue" button in the following "Network Adapter Card Detection" window. 14 From the "Drop Down List", scroll down and select " Requires disk from manufacturer", then click on "Continue". 15 Set the path to "A:\" in the "Insert Disk" dialog box, and then insert the 3COM driver disk in the floppy drive and click "OK". 16 Select "3COM Etherlink (3c509) ISA Adapter" in the "Select OEM Option" dialog box. Click "OK". 17 Select ISA for the BUS Type and click on "OK". 18 Choose the appropriate network protocols by clicking the check boxes in the "Windows NT Setup" dialog box and click on the "Continue" button (Contact your network administrator if you do not have the required information). 19 Press "OK" to continue form "Network Settings" dialog box. 20 If applicable, press "OK" to continue from "NWLink IPX/SPX Protocol Configuration" dialog box. 21 At the "Domain/Workgroup Settings" dialog box, click on "OK" to accept the default "Workgroup" as your workgroup name. 22 To complete the installation, remove the floppy disk, and click on "Restart computer" in the "Windows NT Workstation Networking Setup" dialog box. 23 From the location of the "Novell IntranetWare Client v.4.11b" install files, execute Setupnw.exe". 24 Click on the "Continue" button to proceed with the installation of the Novell IntranetWare Client. 25 Click on "Yes" to agree to the Software License Agreement to begin installation.
-
 1
1 -
2
-
3
-
4
-
5
-
6
-
7
-
8
-
9
-
10
-
11
-
12
-
13
-
14
-
15
-
16
-
17
-
18
-
19
-
20
-
21
-
22
-
23
-
24
-
25
-
26
-
 27
27 -
 28
28 -
 29
29 -
 30
30 -
 31
31 -
 32
32 -
 33
33 -
 34
34 -
 35
35 -
 36
36 -
 37
37 -
38
-
39
 |
 |