HP d3000 HP d3000 Digital Camera - User Manual - Page 21
Recording Images, Videos and Voices
 |
View all HP d3000 manuals
Add to My Manuals
Save this manual to your list of manuals |
Page 21 highlights
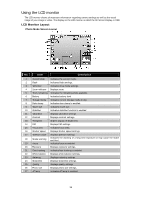
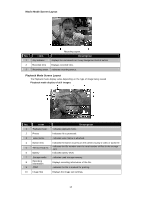
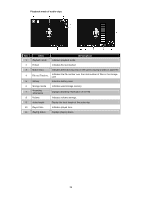
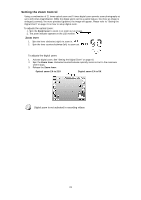
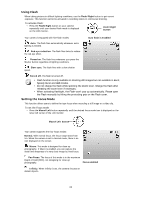
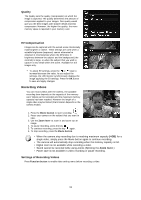
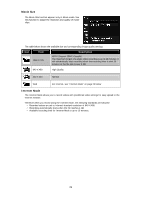
Changing the LCD Monitor Display The type of information displayed on the LCD monitor can be changed using the button. Press the button repeatedly to change the LCD display from one type to another. In Photo Mode, the LCD display can be changed into any of the following: • Basic • Full • None • Guideline • The OSD information may vary depending on the record mode type. • The following icons, if enabled, are still displayed on the LCD even when OSD off or Guide lines on: AEB, Face tracking, AF lamp, Drive mode, and Focus. • Use the "Guide lines" to properly set image for capture. In Playback mode, the LCD display can be changed into any of the following: • Basic • Full • None LCD display cannot be changed in the following situations: • Adjusting Aperture value/Shutter speed under Manual exposure mode. • Adjusting Aperture value under Aperture Priority mode. • Adjusting Shutter speed under Shutter Priority mode. • Recording video or audio clips. • Playing video or audio clips. • Playing slideshow. Recording Images, Videos and Voices Taking Images Now that you are familiar with your camera, you are now ready to take your images. Taking images with your camera is very simple. 1. Turn on the camera by pressing the Power button. 2. Frame the shot using the focus bracket on the LCD monitor. See illustration on the right. 3. Pressing the Shutter button down halfway automatically focuses and adjusts the exposure, and pressing the Shutter button down fully captures the images. When the shake warning icon appears, hold the camera steadily, with your arms at your side or use a tripod to stabilize the camera to prevent blurred images. 20
-
 1
1 -
2
-
3
-
4
-
5
-
6
-
7
-
8
-
9
-
10
-
11
-
12
-
13
-
14
-
15
-
 16
16 -
 17
17 -
 18
18 -
 19
19 -
 20
20 -
 21
21 -
 22
22 -
 23
23 -
 24
24 -
 25
25 -
 26
26 -
27
-
28
-
29
-
30
-
31
-
32
-
33
-
34
-
35
-
36
-
37
-
38
-
39
-
40
-
41
-
42
-
43
-
44
-
45
-
46
-
47
-
48
-
49
-
50
-
51
-
52
-
53
-
54
-
55
-
56
-
57
-
58
-
59
-
60
-
61
-
62
-
63
-
64
-
65
-
66
 |
 |