HP d3000 HP d3000 Digital Camera - User Manual - Page 40
Setting the Drive Mode, Setting the AF Area, Setting the AF Lamp
 |
View all HP d3000 manuals
Add to My Manuals
Save this manual to your list of manuals |
Page 40 highlights
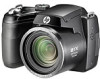
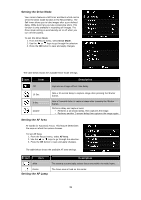
Setting the Drive Mode Your camera features a Self-timer and Burst which can be set in the Drive mode function in the Record Menu. The Self-timer allows you to take images after a pre-defined delay. While burst lets you take consecutive shots. This function is only available in recording still images. The Drive mode setting is automatically set to off when you turn off the camera. To set the Drive Mode 1. From the Record menu, select Drive Mode. 2. Use the or keys to go through the selection. 3. Press the OK button to save and apply changes. The table below shows the available Drive mode settings. Icon Item Description Off Captures an image without time delay. 10 Sec. Sets a 10-second delay to capture image after pressing the Shutter button. 2 Sec. Double Sets a 2-second delay to capture image after pressing the Shutter button. Performs delay and capture twice: • Performs a 10-second delay, then captures the image. • Performs another 2-second delay then captures the image again. Setting the AF Area AF stands for Automatic Focus. This feature determines the area on which the camera focuses. To set AF Area 1. From the Record menu, select AF Area. 2. Use the or keys to go through the selection. 3. Press the OK button to save and apply changes. The table below shows the available AF area settings. Icon Item Description Wide The camera automatically selects focus area within the wide frame. Center Setting the AF Lamp The focus area is fixed on the center. 39
-
 1
1 -
2
-
3
-
4
-
5
-
6
-
7
-
8
-
9
-
10
-
11
-
12
-
13
-
14
-
15
-
16
-
17
-
18
-
19
-
20
-
21
-
22
-
23
-
24
-
25
-
26
-
27
-
28
-
29
-
30
-
31
-
32
-
33
-
34
-
 35
35 -
 36
36 -
 37
37 -
 38
38 -
 39
39 -
 40
40 -
 41
41 -
 42
42 -
 43
43 -
 44
44 -
 45
45 -
46
-
47
-
48
-
49
-
50
-
51
-
52
-
53
-
54
-
55
-
56
-
57
-
58
-
59
-
60
-
61
-
62
-
63
-
64
-
65
-
66
 |
 |
