HP mp3222 HP mp3220 series digital projector - User's Guide - Page 51
Setup > Projector position., Front Ceiling, Then select
 |
View all HP mp3222 manuals
Add to My Manuals
Save this manual to your list of manuals |
Page 51 highlights
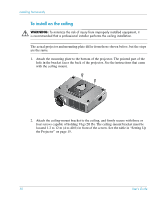
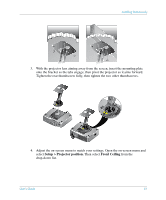
Installing Permanently 3. With the projector lens aiming away from the screen, insert the mounting plate onto the bracket so the tabs engage, then pivot the projector so it aims forward. Tighten the rear thumbscrew fully, then tighten the two other thumbscrews. 4. Adjust the on-screen menu to match your settings. Open the on-screen menu and select Setup > Projector position. Then select Front Ceiling from the drop-down list. User's Guide 51
-
 1
1 -
2
-
3
-
4
-
5
-
6
-
7
-
8
-
9
-
10
-
11
-
12
-
13
-
14
-
15
-
16
-
17
-
18
-
19
-
20
-
21
-
22
-
23
-
24
-
25
-
26
-
27
-
28
-
29
-
30
-
31
-
32
-
33
-
34
-
35
-
36
-
37
-
38
-
39
-
40
-
41
-
42
-
43
-
44
-
45
-
 46
46 -
 47
47 -
 48
48 -
 49
49 -
 50
50 -
 51
51 -
 52
52 -
 53
53 -
 54
54 -
 55
55 -
 56
56 -
57
-
58
-
59
-
60
-
61
-
62
-
63
-
64
-
65
-
66
-
67
-
68
-
69
-
70
-
71
-
72
-
73
-
74
-
75
-
76
-
77
-
78
 |
 |

User’s Guide
51
Installing Permanently
3.
With the projector lens aiming away from the screen, insert the mounting plate
onto the bracket so the tabs engage, then pivot the projector so it aims forward.
Tighten the rear thumbscrew fully, then tighten the two other thumbscrews.
4.
Adjust the on-screen menu to match your settings. Open the on-screen menu and
select
Setup > Projector position.
Then select
Front Ceiling
from the
drop-down list.