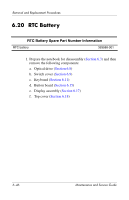
HP nx6125 HP Compaq nx6115 and nx6125 Notebook PC - Maintenance and Service Gu - Page 143
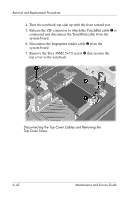
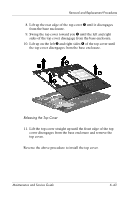
the top cover disengages from the base enclosure., of the top cover until
 |
View all HP nx6125 manuals
Add to My Manuals
Save this manual to your list of manuals |
Page 143 highlights
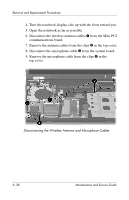
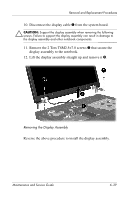
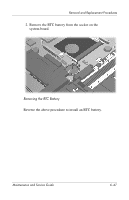
Removal and Replacement Procedures 8. Lift up the rear edge of the top cover 1 until it disengages from the base enclosure. 9. Swing the top cover toward you 2 until the left and right sides of the top cover disengage from the base enclosure. 10. Lift up on the left 3 and right sides 4 of the top cover until the top cover disengages from the base enclosure. Releasing the Top Cover 11. Lift the top cover straight up until the front edge of the top cover disengages from the base enclosure and remove the top cover. Reverse the above procedure to install the top cover. Maintenance and Service Guide 6-43
-
 1
1 -
2
-
3
-
4
-
5
-
6
-
7
-
8
-
9
-
10
-
11
-
12
-
13
-
14
-
15
-
16
-
17
-
18
-
19
-
20
-
21
-
22
-
23
-
24
-
25
-
26
-
27
-
28
-
29
-
30
-
31
-
32
-
33
-
34
-
35
-
36
-
37
-
38
-
39
-
40
-
41
-
42
-
43
-
44
-
45
-
46
-
47
-
48
-
49
-
50
-
51
-
52
-
53
-
54
-
55
-
56
-
57
-
58
-
59
-
60
-
61
-
62
-
63
-
64
-
65
-
66
-
67
-
68
-
69
-
70
-
71
-
72
-
73
-
74
-
75
-
76
-
77
-
78
-
79
-
80
-
81
-
82
-
83
-
84
-
85
-
86
-
87
-
88
-
89
-
90
-
91
-
92
-
93
-
94
-
95
-
96
-
97
-
98
-
99
-
100
-
101
-
102
-
103
-
104
-
105
-
106
-
107
-
108
-
109
-
110
-
111
-
112
-
113
-
114
-
115
-
116
-
117
-
118
-
119
-
120
-
121
-
122
-
123
-
124
-
125
-
126
-
127
-
128
-
129
-
130
-
131
-
132
-
133
-
134
-
135
-
136
-
137
-
 138
138 -
 139
139 -
 140
140 -
 141
141 -
 142
142 -
 143
143 -
 144
144 -
 145
145 -
 146
146 -
 147
147 -
 148
148 -
149
-
150
-
151
-
152
-
153
-
154
-
155
-
156
-
157
-
158
-
159
-
160
-
161
-
162
-
163
-
164
-
165
-
166
-
167
-
168
-
169
-
170
-
171
-
172
-
173
-
174
-
175
-
176
-
177
-
178
-
179
-
180
-
181
-
182
-
183
-
184
-
185
-
186
-
187
-
188
-
189
-
190
-
191
-
192
-
193
-
194
-
195
-
196
-
197
-
198
-
199
-
200
-
201
-
202
-
203
-
204
-
205
-
206
-
207
-
208
-
209
-
210
-
211
-
212
-
213
-
214
-
215
-
216
-
217
-
218
-
219
-
220
-
221
-
222
-
223
-
224
 |
 |

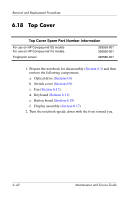
Removal and Replacement Procedures
Maintenance and Service Guide
6–43
8. Lift up the rear edge of the top cover
1
until it disengages
from the base enclosure.
9. Swing the top cover toward you
2
until the left and right
sides of the top cover disengage from the base enclosure.
10. Lift up on the left
3
and right sides
4
of the top cover until
the top cover disengages from the base enclosure.
Releasing the Top Cover
11. Lift the top cover straight up until the front edge of the top
cover disengages from the base enclosure and remove the
top cover.
Reverse the above procedure to install the top cover.