HP nx6320 HP Compaq nx6310, nx6320, nc6320 Notebook PC - Getting Started - Enh - Page 3
First-time setup, Next steps, Step 5: Create recovery discs.1-21
 |
View all HP nx6320 manuals
Add to My Manuals
Save this manual to your list of manuals |
Page 3 highlights
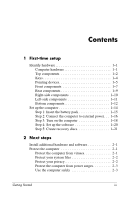
Contents 1 First-time setup Identify hardware 1-1 Computer hardware 1-1 Top components 1-2 Keys 1-4 Pointing devices 1-5 Front components 1-7 Rear components 1-9 Right-side components 1-10 Left-side components 1-11 Bottom components 1-12 Set up the computer 1-14 Step 1: Insert the battery pack 1-15 Step 2: Connect the computer to external power. . . 1-16 Step 3: Turn on the computer 1-18 Step 4: Set up the software 1-20 Step 5: Create recovery discs 1-21 2 Next steps Install additional hardware and software 2-1 Protect the computer 2-1 Protect the computer from viruses 2-1 Protect your system files 2-2 Protect your privacy 2-2 Protect the computer from power surges 2-3 Use the computer safely 2-3 Getting Started iii
-
 1
1 -
 2
2 -
 3
3 -
 4
4 -
 5
5 -
 6
6 -
 7
7 -
 8
8 -
 9
9 -
10
-
11
-
12
-
13
-
14
-
15
-
16
-
17
-
18
-
19
-
20
-
21
-
22
-
23
-
24
-
25
-
26
-
27
-
28
-
29
-
30
-
31
-
32
-
33
-
34
-
35
-
36
-
37
-
38
-
39
-
40
-
41
-
42
-
43
-
44
-
45
-
46
-
47
-
48
-
49
-
50
-
51
-
52
-
53
-
54
-
55
-
56
-
57
-
58
-
59
-
60
-
61
-
62
-
63
-
64
 |
 |

Contents±
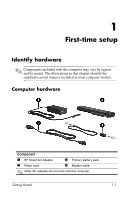
1 First-time setup
Identify hardware . . . . . . . . . . . . . . . . . . . . . . . . . . . . . . . 1–1
Computer hardware . . . . . . . . . . . . . . . . . . . . . . . . . . 1–1
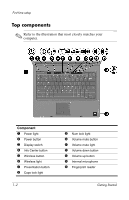
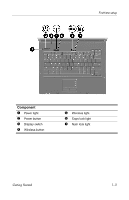
Top components . . . . . . . . . . . . . . . . . . . . . . . . . . . . 1–2
Keys . . . . . . . . . . . . . . . . . . . . . . . . . . . . . . . . . . . . . . 1–4
Pointing devices. . . . . . . . . . . . . . . . . . . . . . . . . . . . . 1–5
Front components . . . . . . . . . . . . . . . . . . . . . . . . . . . 1–7
Rear components . . . . . . . . . . . . . . . . . . . . . . . . . . . . 1–9
Right-side components . . . . . . . . . . . . . . . . . . . . . . 1–10
Left-side components . . . . . . . . . . . . . . . . . . . . . . . 1–11
Bottom components . . . . . . . . . . . . . . . . . . . . . . . . . 1–12
Set up the computer . . . . . . . . . . . . . . . . . . . . . . . . . . . . 1–14
Step 1: Insert the battery pack . . . . . . . . . . . . . . . . . 1–15
Step 2: Connect the computer to external power. . . 1–16
Step 3: Turn on the computer . . . . . . . . . . . . . . . . . 1–18
Step 4: Set up the software . . . . . . . . . . . . . . . . . . . 1–20
Step 5: Create recovery discs. . . . . . . . . . . . . . . . . . 1–21
2 Next steps
Install additional hardware and software . . . . . . . . . . . . . 2–1
Protect the computer . . . . . . . . . . . . . . . . . . . . . . . . . . . . 2–1
Protect the computer from viruses. . . . . . . . . . . . . . . 2–1
Protect your system files . . . . . . . . . . . . . . . . . . . . . . 2–2
Protect your privacy. . . . . . . . . . . . . . . . . . . . . . . . . . 2–2
Protect the computer from power surges . . . . . . . . . . 2–3
Use the computer safely . . . . . . . . . . . . . . . . . . . . . . 2–3
Getting Started
iii