Hitachi 51F59 Owners Guide
Hitachi 51F59 Manual
 |
View all Hitachi 51F59 manuals
Add to My Manuals
Save this manual to your list of manuals |
Hitachi 51F59 manual content summary:
- Hitachi 51F59 | Owners Guide - Page 1
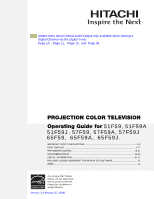
39 PROJECTION COLOR TELEVISION Operating Guide for 51F59, 51F59A 51F59J, 57F59, 57F59A, 57F59J 65F59, 65F59A, 65F59J. IMPORTANT SAFETY INSTRUCTIONS 2-3 FIRST TIME USE ...4-17 THE REMOTE CONTROL ...18-31 ON-SCREEN DISPLAY ...32-60 USEFUL INFORMATION...61-71 END USER LICENSE AGREEMENT FOR HITACHI DTV - Hitachi 51F59 | Owners Guide - Page 2
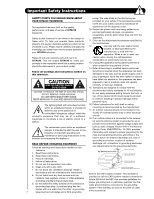
, performance, and ease of service of HITACHI televisions. replacement of the obsolete outlet. 10 supporting structure, grounding of the lead-in wire to an antenna discharge unit, size of grounding connectors, location of antenna- READ BEFORE OPERATING EQUIPMENT Follow all warnings and instructions - Hitachi 51F59 | Owners Guide - Page 3
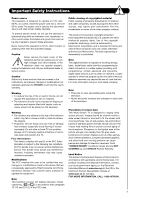
television services may require the use of a set-top box. For more information call your local cable company. Note • There are no user serviceable parts inside the television. • Model and serial numbers are indicated on back side of the television. Prevention of screen burn This Wide Screen TV - Hitachi 51F59 | Owners Guide - Page 4
» "Z" Allen Key (65" Models Only) ³ Remote Control Unit CLU-4361S (Part No. HL02291). · Two "AA" size, 1.5V batteries (For Remote Control Unit). » "Z" Allen Key (Part No. 61010122). Provided only when Allen Screws are used. REMOTE CONTROL BATTERY INSTALLATION AND REPLACEMENT 1. Open the battery - Hitachi 51F59 | Owners Guide - Page 5
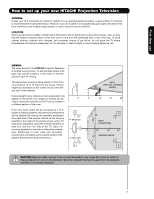
use How to set up your new HITACHI Projection Television ANTENNA Unless your TV is connected to a cable TV system or to a centralized antenna system, a good outdoor TV antenna picture screen center. For best stereo separation, place the external speakers at least four feet from the side of the TV, - Hitachi 51F59 | Owners Guide - Page 6
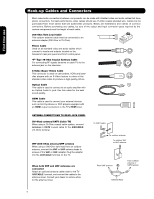
to connect your external devices such as Set-Top-Boxes or DVD players equipped with an HDMI output connection to the TV's HDMI input. ANTENNA CONNECTIONS TO REAR JACK PANEL (75-Ohm) antenna/CATV (Cable TV) When using a 75-Ohm coaxial cable system, connect Antenna or CATV coaxial cable to the AIR - Hitachi 51F59 | Owners Guide - Page 7
picture mode settings between DAY and NIGHT mode. PIP BUTTON (TV) Press to show and change the Picture-in-Picture mode. EXIT BUTTON (TV, CBL, SAT) Exits out of the OSD or INPUTS menu systems if their menu is displayed. INFO BUTTON (TV, CBL, SAT) Displays various information on the screen. GUIDE - Hitachi 51F59 | Owners Guide - Page 8
less, the volume level will be at the level it was set when the TV is turned ON. ² MAGIC FOCUS button Use this button to automatically adjust your picture quality to optimum performance (see page 53). ¶ FRONT INPUT JACKS (INPUT 5) Use these audio/video jacks for a quick hook-up from a camcorder or - Hitachi 51F59 | Owners Guide - Page 9
First time use Front Panel Jacks and Connections The front panel jacks are provided as plugs when connecting to front panel jacks. If you do not, the played back picture may be abnormal. 2. If you have a S-VHS VCR, use the S-INPUT cable in place of the standard video cable. 3. If you have a mono VCR - Hitachi 51F59 | Owners Guide - Page 10
all the way to your television screen. Use the HDMI input for your external devices such as Set-Top-Boxes or DVD players equipped with an HDMI output connection. CH1 NOTE 1: Optical Audio Out "Only" available using Digital Tuner on Digital Channels. No other input's Audio is output via Optical - Hitachi 51F59 | Owners Guide - Page 11
and return your warranty card. ¾ TV AS CENTER (INPUTS 1-4) These jacks are for stereo amplifiers with center signal output capability. This feature allows the TV speakers to be used as a center speaker. The TV must be set as a center channel by selecting TV AS CENTER on the Internal Speakers - Hitachi 51F59 | Owners Guide - Page 12
using an HDMI input from a Set-Top-Box, it is recommended that a 1080i or 720p input signal CH1 is used. NOTE 2: HDMI Audio is Not output via Optical Audio Output jack. • Your component outputs may be labeled Y, B-Y, and R-Y. In this case, connect the components B-Y output to the TV's PB input - Hitachi 51F59 | Owners Guide - Page 13
diagram for speaker placement. ³ The television's internal speakers will act as center speaker (select AUDIO - INTERNAL SPEAKERS - TV AS CENTER). · These FRONT left and right speakers are connected to the FRONT output of a separate audio amplifier. » These REAR left and right speakers are connected - Hitachi 51F59 | Owners Guide - Page 14
The exact arrangement you use to connect the VCR, camcorder, laserdisc player, DVD player, or HDTV Set Top Box to your TV set is dependent on the model and features of each component. Check the owner's manual of each component for the location of video and audio inputs and outputs. The following - Hitachi 51F59 | Owners Guide - Page 15
to rear panel jacks. The picture and sound that is played back will be abnormal if the connection is loose. 2. When INPUT 3 or 4 are used, it the INPUT (S-VIDEO) jack, as shown on the TV to the right. 2. Connect the cable from the AUDIO OUT R of the VCR or the laserdisc player to the INPUT (AUDIO - Hitachi 51F59 | Owners Guide - Page 16
External Video Sources CONNECTING A COMPONENT SOURCE WITH HDMI OR DVI CAPABILITY TO INPUT 1 1. Connect the HDMI or DVI to HDMI connection cable from the output of the HDTV set top box or DVD player to the HDMI input as shown on the TV to the right. When using a component with DVI output, you also - Hitachi 51F59 | Owners Guide - Page 17
or HDTV set top box. The VIDEO OSD label disappears automatically after approximately four seconds. 7. Select CABLE/AIR from the INPUTS menu to return to the last channel tuned. NOTE: 1. Completely insert the connection cord plugs when connecting to rear panel jacks. The picture and sound that - Hitachi 51F59 | Owners Guide - Page 18
Remote Control The Remote Control In addition to controlling all the functions on your HITACHI Projection TV, the new remote control is designed to operate different types of VCRs, CATV (Cable TV) converters, set-top-boxes, satellite receivers (SAT) and DVD players with one touch. Basic operation - Hitachi 51F59 | Owners Guide - Page 19
Use the Remote to Control Your TV ³ POWER button Press this button to turn the TV set on or off when the remote is in TV mode. (See page 20 for instructions on how to set the remote control to TV button to toggle between Day and Night picture mode settings. Select DAY for day time viewing with - Hitachi 51F59 | Owners Guide - Page 20
(Auto Aspect: On) • Component-480i/480p 16:9 Input (Auto Aspect: On) • Antenna-Digital CH (16:9) • HDMI-720p/1080i (16:9)Input • Component-720p/1080i (16:9)Input NOTE: 1. All five video inputs have independent Aspect Style settings. 2. Vertical position adjustments are directly available when you - Hitachi 51F59 | Owners Guide - Page 21
Input 5. AIR/ CABLE Select to choose Air or Cable signal. ¶ PICTURE-IN-PICTURE button See separate section on pages 23-27 for a description. º MENU button The MENU button will start the On-Screen Display. ¾ GUIDE button [Cable Box (CBL), Satellite Receiver (SAT)/ Set-Top-Box (STB) mode only] The use - Hitachi 51F59 | Owners Guide - Page 22
tuned channels. You can add any channel to your Favorite channel list by pressing and holding down the FAV CH button until the set when the TV is turned on. ƹ CHANNEL SELECTOR/FAVORITE CHANNEL (FAV CH) buttons The CHANNEL SELECTOR buttons are used to select channels, lock access code, etc. Use - Hitachi 51F59 | Owners Guide - Page 23
-Picture (PIP) Your HITACHI Projection TV incorporates one Tuner technology designed for improved viewing enjoyment. This Tuner feature allows you to view antenna input on the main picture and a Video Input on sub-picture simultaneously. When an ANALOG channel or INPUT is viewed as the main picture - Hitachi 51F59 | Owners Guide - Page 24
(Main Freeze, SPLIT and STROBE). PIP MAIN PICTURE SUB PICTURE SPLIT Mode Picture-in-Picture Split Mode PIP displays the main picture and subpicture evenly on the screen. MAIN PICTURE SUB PICTURE EXIT Freeze Freeze Freeze Freeze Freeze Note : PIP Specifications in the following pages 26 & 27. 24 - Hitachi 51F59 | Owners Guide - Page 25
useful for viewing a moving picture that has many details, for example, a close play in a sporting event or a golf swing. Please refer to page 27 for detailed spec 3. When the input is HDMI signal , the FREEZE mode is the MAIN picture FREEZE. EXIT Note : PIP Specifications in the following pages 26 & - Hitachi 51F59 | Owners Guide - Page 26
The Remote Control Picture-in-Picture (PIP) PIP Specifications Sub Picture Main Picture Sub Pic. Main Pic. Sub picture Sub Pic. Main Pic. Sub picture 4x3 Sub Pic. Main Pic. 26 - Hitachi 51F59 | Owners Guide - Page 27
The Remote Control Picture-in-Picture (PIP) PIP Specifications (cont.) 27 - Hitachi 51F59 | Owners Guide - Page 28
After replacing the batteries repeat the entire programming procedure as stated above. ³ CABLE (CBL) button This button allows the remote to control your cable box by setting BOX CODE IS NOTE: Refer to instruction manual of the Cable Box for operation of the buttons exclusively for the Cable Box - Hitachi 51F59 | Owners Guide - Page 29
are for operating the TV. SATELLITE BRAND CODES ECOSTAR 03 HITACHI 00 HUGHES 04 RCA 01 SONY 02 SET TOP BOX BRAND CODES PANASONIC 05 RCA 06 SAMSUNG 07 ZENITH 08 MY SATELLITE RECEIVER/ SET TOP BOX CODE IS NOTE: Refer to instruction manual of the set-topbox/satellite receiver - Hitachi 51F59 | Owners Guide - Page 30
Buttons These buttons are for operating the TV. DVD BRAND CODES APEX 09 GO VIDEO 08 HITACHI 00 KENWOOD 10 PANASONIC 02 PIONEER 03 RCA 04 SAMSUNG 06 SANYO 07 SONY 01 TOSHIBA 05 MY DVD PLAYER CODE IS NOTE: Refer to instruction manual of the DVD player for operation of the - Hitachi 51F59 | Owners Guide - Page 31
are for operating the TV. » · VCR BRAND CODES AIWA 20 FUNAI 21 HITACHI 00, 01, 02, 03, 04, 05, 06 JVC 13 MITSUBISHI 16,17 PANASONIC 10, 11 SAMSUNG 14,15 ZENITH 19 SHARP 18 SONY 07, 08, 09 TOSHIBA 12 MY VCR PLAYER CODE IS NOTE: Refer to instruction manual of the VCR - Hitachi 51F59 | Owners Guide - Page 32
Display 1. Press MENU on the remote control to display the different features on your HITACHI Projection TV. 2. Press the CURSOR buttons to navigate and highlight a different feature of the On-Screen Display menu. Press the SELECT button to select. 3. Press EXIT on the remote control to quickly - Hitachi 51F59 | Owners Guide - Page 33
picture mode settings. Set viewing reservation for TV programs. Setup Magic Focus Tune Up Automatic and manual alignment of the red, green and blue colors to make white. Menu Preference Choose English, French, or Spanish text. Set The Inputs Label Video Inputs, VCR, DVD, etc. Virtual HD - Hitachi 51F59 | Owners Guide - Page 34
If RESET is selected, only the selected input will reset to initial conditions. Picture Mode Use this function to choose from automatic picture settings to optimize your TV's performance. 1. Use the CURSOR buttons ̇ or ̈ to highlight and select PICTURE MODE settings. 2. Press EXIT to quit menu or - Hitachi 51F59 | Owners Guide - Page 35
factory settings. Reset Move SEL Return Auto Color The AUTO COLOR function automatically monitors and adjusts the color to maintain natural flesh tones while preserving fidelity of background colors. NOTE: When using Component, HDMI input, Auto Color will not be available (grayed out). On-Screen - Hitachi 51F59 | Owners Guide - Page 36
ON from the VIDEO menu, your Hitachi Projection Television will activate the circuitry for this special feature to improve video performance when watching film based sources. NOTES: 1. When using Progressive Scan Component or HDMI input (Ex. 480p, 720p, 1080i), Auto Movie Mode will not be available - Hitachi 51F59 | Owners Guide - Page 37
TV to your preference and to improve the s ound quality. 1. Use of the Projection TV internal speakers. rear of the listener. Wide Surround : Reproduce much better quality 5 channel sound signals from ordinary stereo contents comparing with normal surround technology. Wide surround enable users - Hitachi 51F59 | Owners Guide - Page 38
TV-PG DLSV Day AUTO VIEW --:--AM --:--AM HD 1080i 16:9 Standard Internal Speakers This function is useful when setting up the external speakers. ON TV as Center OFF Select this feature if using automatically adjust volume so each channel and input has the same average volume level. Loudness - Hitachi 51F59 | Owners Guide - Page 39
the TV is connected via the optical out (digital audio) to an amplifier/receiver with a Dolby® Digital decoder. The default setting is ON. Use using Digital Tuner on Digital Channels. No other input's Audio is output via Optical Audio Out. This includes HDMI audio. It is not output. CH1 On-Screen - Hitachi 51F59 | Owners Guide - Page 40
adjust the Aspect Ratio depending on the input signal to fill the screen. NOTE: 1. The Auto Aspect function is recommended on an input signal with VIDEO ID. 2. The Auto Aspect function is best used on COMPOSITE VIDEO, S-VIDEO, 480i and 480p COMPONENT/HDMI signals. 3. Press the CURSOR buttons ̇ or - Hitachi 51F59 | Owners Guide - Page 41
Manager Select CHANNEL MANAGER to set your Antenna options, run Auto Channel Scan, Check Signal Meter and Set Channel List. 1. Use the CURSOR buttons ̆ or Channel List Move SEL Return Channel Manager Signal Meter Channel Strength Peak 15-1 91 91 Close Move SEL Return On-Screen Display 41 - Hitachi 51F59 | Owners Guide - Page 42
SCAN and LOCK Columns. 3. To select the LOCK column, input the access code. (Default access code: 0000) Channel Manager Signal Meter Auto Channel Scan Channel List Move SEL Return 4. Press the FAV button to set or remove the FAVORITES settings. 5. Press the EXIT button to return to normal viewing - Hitachi 51F59 | Owners Guide - Page 43
will also be blocked automatically (see page 44). When TV RATINGS is selected, various types of television programming based on a par ental guide ratings will be blocked. Pictur e-in-Pictur e will also be blocked automatically (see page 45). Use CANADIAN RATINGS to block various types of movies and - Hitachi 51F59 | Owners Guide - Page 44
that you feel may be inappropriate due to its content. 1. Use the CURSOR buttons ̆ or ̄ to select the MOVIE RATING the TV will not block it. 2. Blocking NOT RATED programs may block emergency programming, sports, news, public service announcements, religious programs and weather. On-Screen Display - Hitachi 51F59 | Owners Guide - Page 45
Ratings U.S. Move SEL Select Locks TV Ratings OR Sub Rating Status D L S V FV TV-Y TV-Y7 TV-G TV-PG TV-14 TV-MA Move SEL Return TV Parental Guide Ratings Table TV-Y All children. The themes and elements in this program are specifically designed for a very young audience, including - Hitachi 51F59 | Owners Guide - Page 46
) to block any type of movie and television program in Canada that you feel might be inappropriate in its content. 1. Use the CURSOR buttons ̆ or ̄ to select sexual content. C8+ Programming generally considered acceptable for children 8 years and over to watch on their own - Violence Guidelines: - Hitachi 51F59 | Owners Guide - Page 47
might be inappropriate in its content. 1. Use the CURSOR buttons ̆ or ̄ to selected, for example 8 ANS+, all movies and television programs rated 8 ANS+ and higher will be Locks Change Access Code Engage Lock Movie Ratings TV Ratings Canadian Ratings(Eng) Canadian Ratings(Frn) Screen Display 47 - Hitachi 51F59 | Owners Guide - Page 48
the R/C. See fig. (1) for reference. Once the TV has received Alternate Ratings data , the Alternate Ratings US in the lock menu will become available. Broadcast Received Alternate Ratings Day AUTO VIEW --:--AM --:--AM HD 1080i Fig. (1) 1. Use the CURSOR buttons ̄ or to select the ALTERNATE - Hitachi 51F59 | Owners Guide - Page 49
On-Screen Display This page is left blank intentionally 49 - Hitachi 51F59 | Owners Guide - Page 50
the CURSOR buttons ̇, ̈, ̆ or ̄ to highlight the CURRENT TIME (hour and minute), AM or PM, MONTH, DAY, and YEAR. 4. Use the CURSOR buttons ̆ and ̄ to adjust settings. Timers Set The Clock OR Time Zone : . PST MST CST EST AKST HST ATL Daylight Saving Corrections Time : -- : -- AM Jan. 01 - Hitachi 51F59 | Owners Guide - Page 51
00. Timers Set The Clock Set Sleep Timer 0:00 Set Day/Night Timer Set Event Timer Move SEL Set Set Day/Night Timer Select this feature to activate and set your TV's DAY/NIGHT PICTURE MODE automatically. 1. Use the CURSOR buttons ̆ or ̄ to highlight SET DAY/NIGHT TIMER settings. 2. Press the - Hitachi 51F59 | Owners Guide - Page 52
Timer This function will automatically operate the Projection TV viewing reservation of a program. If the clock is not set, you can not use this function and the screen below will appear. The message on the screen will disappear after 3 seconds, then the screen automatically goes to the clock setup - Hitachi 51F59 | Owners Guide - Page 53
On-Screen Display Magic Focus Tune Up Auto Digital Convergence Adjustment Please turn ON your television for at least 20 minutes before using this feature. The MAGIC FOCUS button on control panel will not work when adjustment mode is set to MANUAL (see page 55 or 56). Your HITACHI Projection TV - Hitachi 51F59 | Owners Guide - Page 54
The Inputs Set Virtual HD Set Black Side Panel Set Closed Captions Set Audio Out Upgardes Move SEL Set Setup Magic Focus Tune Up OR Aligns the Red, Green and Blue colors to correct for Magnetic Influences. Adjustment Mode Auto At turn off 9 Point Manual after 90 days. 117 Point Manual - Hitachi 51F59 | Owners Guide - Page 55
ON your television for at least 20 minutes before using this feature. 2. AUTO ADJUSTMENT MODE is recommended. If convergence is still not acceptable, use the MANUAL ADJUSTMENT MODE. 3. If AUTO ADJUSTMENT MODE is selected or the MAGIC FOCUS button is pressed, all manual adjust mode settings will be - Hitachi 51F59 | Owners Guide - Page 56
ON your television for at least 20 minutes before using this feature. 2. AUTO ADJUSTMENT MODE is recommended. If convergence is still not acceptable, use the MANUAL ADJUSTMENT MODE. 3. If AUTO ADJUSTMENT MODE is selected or the MAGIC FOCUS button is pressed, all manual adjust mode settings will be - Hitachi 51F59 | Owners Guide - Page 57
menu. 3. Select SOLID for a black background (no picture can be seen behind menu screen), or select SHADED for a light background. Set The Inputs Use this feature to give a name to any of the five video inputs. A named input is shown in the INPUTS menu. 1. Press the CURSOR buttons ̇, ̈, ̆ or ̄ to - Hitachi 51F59 | Owners Guide - Page 58
, the TV will automatically turn off after three hours. Set Virtual HD Use this feature to select between 1080i and 540p OR scan mode. Set Virtual HD Next/Prev. 1080i Select SEL Return On-Screen Display When content from film is sent to your home it requires processing that can cause picture - Hitachi 51F59 | Owners Guide - Page 59
a television program or home video which are displayed on the TV screen. Your local TV program guide denotes these programs as or . 1. Use the CURSOR buttons ̇, ̈, ̆ or ̄ to highlight and select the function to change. Setup Magic Focus Tune Up OR Menu Preference Set The Inputs Set Virtual HD - Hitachi 51F59 | Owners Guide - Page 60
Inputs Set Virtual HD Set Black Side Panel Set Closed Captions Set Audio Out Upgrades Move SEL Set Setup Set Audio Out OR Audio Out Variable F ix ed Move SEL Return Upgrades It shows software information and easy upgrade procedure. This function allows the TV software to be upgraded by using - Hitachi 51F59 | Owners Guide - Page 61
instructions and understand how to properly and safely disassemble and assemble unit STEP 1 (a) (b) Before disassembling this projection TV set (f)(g). (c) (d) (e) (f) (g) Useful Information ¿» · ³ ¿ STEP 2 Remove 4 screws that hold the (a) (b) screen frame to the cabinet on the - Hitachi 51F59 | Owners Guide - Page 62
that is provided inside of the instruction bag, see (a) and (b). In case that the screw is different type use the proper screwdriver to remove the screws. STEP 6 (a) (b) (c) Remove from the back side of the TV set only the top 4 screws of the lower rear cover, see (b), as shown by the - Hitachi 51F59 | Owners Guide - Page 63
Instructions ASSEMBLY PROCEDURE STEP 8 To re-assemble the set rear cover, see (a). Re-install the (4) four side screws that hold the back cover to the cabinet, see (b). Useful shows. (a) left side Please re-install screw (· ) below screen frame that hold the back cover to the cabinet as the - Hitachi 51F59 | Owners Guide - Page 64
instructions and understand how to properly and safely disassemble and assemble unit STEP 1 Before disassembling this projection TV set original position, see (d)(e). (c) (d) (e) Useful Information STEP 2 Remove the 8 (a) screws that hold the screen frame to the cabinet on the front side - Hitachi 51F59 | Owners Guide - Page 65
Remove the joint connector bolts from each side of the TV set using the allen wrench that is provided inside of the instruction bag, see (a) and (b). STEP 5 Remove from the back side of the TV set only the (a) (b) top 4 screws of the lower rear cover, see (b), as shown by the arrows on the - Hitachi 51F59 | Owners Guide - Page 66
Useful Information 65 6"5D"isDaisssaesmsebmlyb/Alys/sAesmsebmlybIlnysItnrsutcrtuioctnisons ASSEMBLY PROCEDURE STEP 7 To re-assemble the set, lift the top portion and align onto the bottom cabinet. Gently lower the top portion until it sits flush on the bottom. STEP 8 Re-install - Hitachi 51F59 | Owners Guide - Page 67
operation will become erratic or possibly stop altogether. Replace the old batteries with two new "AA" size batteries screen to prolonged direct sunlight or heat may cause the screen to permanently warp, resulting in a distorted picture.. Useful Information TROUBLESHOOTING HITACHI Projection Television - Hitachi 51F59 | Owners Guide - Page 68
system such as unshielded leads or connecting several sets to the same antenna without using multiple antenna couplers. SNOW: If your receiver is located in the fringe area of a television station where the signal is weak, your picture may be marred by the appearance of small dots. When the signal - Hitachi 51F59 | Owners Guide - Page 69
-Use (3-Language) On-Screen Menu • Full Set of Input Jacks, including S-Video • COMPONENT VIDEO: Y-PB/PR • Velocity Modulation • Six Aspect Modes • Closed Caption Decoder • 1-Tuner Picture in Picture • Magic Focus (Auto Digital Convergence and 9- point/117-point Manual Adjustment) • 1 Antenna Input - Hitachi 51F59 | Owners Guide - Page 70
, 24 hours a day 1-800-HITACHI (1-800-448-2244) HITACHI AMERICA, LTD. HOME ELECTRONICS DIVISION HITACHI has made every effort to assure you hours of trouble free operation from your unit. However, should you require service, a network of HITACHI Authorized Service Facilities has been established in - Hitachi 51F59 | Owners Guide - Page 71
: This End User License Agreement for HITACHI DTV Software (this "Agreement") is a legal agreement between you ("you" or "your"), in your capacity as the owner of a HITACHI brand digital television (the "DTV"), and HITACHI America, Ltd., Home Electronics Division ("HITACHI"). By using the DTV or - Hitachi 51F59 | Owners Guide - Page 72
/Assembly Instructions (65 64-66 E Event Timer 52 G Guide Button 7, 21 H HDMI 10, 12, 16 I Input button 7, 21 L Language Menu Language 57 Audio Language 39 Locks Change Access Code ........43 Channel Lock 43 Front Panel Lock 43 Movie Ratings 44 TV Ratings 45 TV Ratings (Canadian - Hitachi 51F59 | Owners Guide - Page 73
Notes 73 - Hitachi 51F59 | Owners Guide - Page 74
Notes 74 - Hitachi 51F59 | Owners Guide - Page 75
QR66561
-
 1
1 -
 2
2 -
 3
3 -
 4
4 -
 5
5 -
 6
6 -
 7
7 -
8
-
9
-
10
-
11
-
12
-
13
-
14
-
15
-
16
-
17
-
18
-
19
-
20
-
21
-
22
-
23
-
24
-
25
-
26
-
27
-
28
-
29
-
30
-
31
-
32
-
33
-
34
-
35
-
36
-
37
-
38
-
39
-
40
-
41
-
42
-
43
-
44
-
45
-
46
-
47
-
48
-
49
-
50
-
51
-
52
-
53
-
54
-
55
-
56
-
57
-
58
-
59
-
60
-
61
-
62
-
63
-
64
-
65
-
66
-
67
-
68
-
69
-
70
-
71
-
72
-
73
-
74
-
75
 |
 |

PROJECTION COLOR TELEVISION
IMPORTANT SAFETY INSTRUCTIONS
.......................................................................................
2-3
FIRST TIME USE
.......................................................................................................................
4-17
THE REMOTE CONTROL
........................................................................................................
18-
31
ON-SCREEN DISPLAY
............................................................................................................
32
-
60
USEFUL INFORMATION
..........................................................................................................
61
-
71
END USER LICENSE AGREEMENT FOR HITACHI DTV SOFTWARE
...........................................
71
51F59, 51F59A
Operating Guide for
As an Energy Star
®
Partner,
Hitachi, Ltd. has determined
that this product meets the
Energy Star
®
guidelines for
energy efficiency.
INDEX
.............................................................................................................................................
72
51F59J, 57F59, 57F59A, 57F59J
65F59, 65F59A, 65F59J.
CH1
Added notes about Optical Audio Output only available when viewing a
Digital Channel via the Digital Tuner.
Page 10,
Page 11,
Page 13,
and
Page 39
Version: 2 (February 25, 2008)