Hitachi 51F59 Owners Guide - Page 35
Video
 |
View all Hitachi 51F59 manuals
Add to My Manuals
Save this manual to your list of manuals |
Page 35 highlights
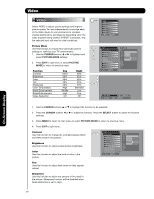
Video Color Temperature Set this to High for cooler color with more blue, set to Medium for more natural color, set to Standard for accurate color. Black Enhancement Use this function to enhance Picture brightness in light scenes using the settings off, low, middle and high. Edge Enhancement Use this function to automatically enhance the edges between light and dark areas using the settings Off, Low, Middle and High. NOTE: 1. If CONTRAST is selected, you are adjusting CONTRAST. The additional menu items BRIGHTNESS, COLOR, TINT, and SHARPNESS can be selected and adjusted in the same manner. 2. It may be necessary to adjust TINT to obtain optimum picture quality when using the COMPONENT VIDEO Y-PBPR input jacks. 3. CABLE and AIR share a Video setting. Also, each of the video inputs have their own independent settings. Reset Video Settings This function allows you to Reset the Video Menu Settings of the present input and return it to the Day VIDEO mode. 1. Use the CURSOR buttons ̆ or ̄ to highlight the function to be adjusted. 2. Press the SELECT button to select RESET VIDEO SETTINGS. 3. Use the CURSOR button ̄ to access other video settings. You can customize each of the Video Inputs to your preference to increase viewing performance and pleasure, depending upon the video program being viewed. If RESET is selected, only the selected Input will reset to the initial conditions as explained above. If RESET is selected in Input 1, only Input 1 will return to factory conditions. Video Pictu re Mode Contrast Brightness Color Tint Sharpness Color Temperatu re Black Enhancement Edge Enhancement Reset Video Settings Move SEL Retu rn Day 100% 50% 50% 50% High Middle High Video Reset Video Settings OR Select "Reset" to return the video menu settings on this Input to the original factory settings. Reset Move SEL Return Auto Color The AUTO COLOR function automatically monitors and adjusts the color to maintain natural flesh tones while preserving fidelity of background colors. NOTE: When using Component, HDMI input, Auto Color will not be available (grayed out). On-Screen Display 35
-
 1
1 -
2
-
3
-
4
-
5
-
6
-
7
-
8
-
9
-
10
-
11
-
12
-
13
-
14
-
15
-
16
-
17
-
18
-
19
-
20
-
21
-
22
-
23
-
24
-
25
-
26
-
27
-
28
-
29
-
 30
30 -
 31
31 -
 32
32 -
 33
33 -
 34
34 -
 35
35 -
 36
36 -
 37
37 -
 38
38 -
 39
39 -
 40
40 -
41
-
42
-
43
-
44
-
45
-
46
-
47
-
48
-
49
-
50
-
51
-
52
-
53
-
54
-
55
-
56
-
57
-
58
-
59
-
60
-
61
-
62
-
63
-
64
-
65
-
66
-
67
-
68
-
69
-
70
-
71
-
72
-
73
-
74
-
75
 |
 |
