Honeywell MK7580-30B41-00 User Guide - Page 19
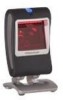
Position the imager so the base plate sits flush over the locking plate.
 |
View all Honeywell MK7580-30B41-00 manuals
Add to My Manuals
Save this manual to your list of manuals |
Page 19 highlights
5. Use the locking plate as a guide to drill three #39 pilot holes (A) in the mounting surface. Figure 13. Locking Plate (Not Drawn to Scale) 6. Secure the locking plate to the wall with the three #7 wood screws () provided in the kit. Figure 14 7. Position the imager so the base plate sits flush over the locking plate. Twist the imager 90° counter-clockwise to lock the imager into place. Figure 15 15
-
 1
1 -
2
-
3
-
4
-
5
-
6
-
7
-
8
-
9
-
10
-
11
-
12
-
13
-
 14
14 -
 15
15 -
 16
16 -
 17
17 -
 18
18 -
 19
19 -
 20
20 -
 21
21 -
 22
22 -
 23
23 -
 24
24 -
25
-
26
-
27
-
28
-
29
-
30
-
31
-
32
-
33
-
34
-
35
-
36
-
37
-
38
-
39
-
40
-
41
-
42
-
43
-
44
-
45
-
46
-
47
-
48
-
49
-
50
-
51
-
52
-
53
-
54
-
55
-
56
-
57
-
58
-
59
-
60
-
61
-
62
-
63
-
64
-
65
-
66
-
67
-
68
 |
 |

15
5.
Use the locking plate as a guide to drill three #39 pilot holes (A) in the
mounting surface.
Figure 13. Locking Plate (Not Drawn to Scale)
6.
Secure the locking plate to the wall with the three #7 wood screws (
)
provided in the kit.
Figure 14
7.
Position the imager so the base plate sits flush over the locking plate.
Twist the imager 90° counter-clockwise to lock the imager into place.
Figure 15