Honeywell NSLAN1 Installation Guide - Page 9
Hardware Setup and Installation - programming guide
 |
View all Honeywell NSLAN1 manuals
Add to My Manuals
Save this manual to your list of manuals |
Page 9 highlights
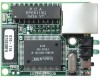
NSLAN1 Ethernet Board Installation Guide Hardware Setup and Installation • A Network Crossover cable to connect directly to the NS2 or a Network Connection that is on the same network segment as the NS2. Note: When programming the Ethernet board, verify that you're not initially going through a gateway or a router. When programming is complete the unit can be installed on a different network segment. Hardware Setup and Installation 1. Before mounting the NSLAN1 onto the NS2 Control Panel, take note of the MAC address on the back of the NSLAN1 Ethernet Board. This address will be needed during programming of the board as well as an IP address, Subnet Mask, and Gateway, which your MIS/IT department will assign. • MAC Address Static IP Address Check with MIS\IT Department) • Subnet Mask Check with MIS\IT Department) • Default Gateway Check with MIS\IT Department) 2. Set the NS2 DIP switches. Switch 1 2 3 4 5 6 7 8 9 10 Setting On or Off depending on panel address. On or Off depending on panel address. On or Off depending on panel address. On or Off depending on panel address. On or Off depending on panel address. Off (RS232) On (57600 baud) Off (RS485 bias & EOL) Off (RS485 bias & EOL) Off (RS485 EOL) 3. Mount the NSLAN1 Ethernet Board to the NS2 board. Refer to Mounting Diagram on page 12. Document TD1164, Revision A © 2005 Honeywell International 7 NSLAN1 Ethernet Board Installation Guide
-
 1
1 -
2
-
3
-
 4
4 -
 5
5 -
 6
6 -
 7
7 -
 8
8 -
 9
9 -
 10
10 -
 11
11 -
 12
12 -
 13
13 -
 14
14 -
15
-
16
-
17
-
18
-
19
 |
 |
