Hoover FH51000 Product Manual - Page 22
Warning, Important
 |
View all Hoover FH51000 manuals
Add to My Manuals
Save this manual to your list of manuals |
Page 22 highlights
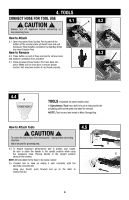
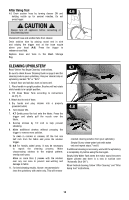
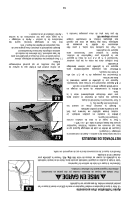
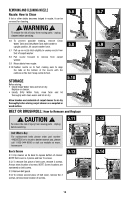
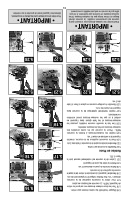
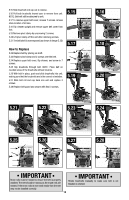
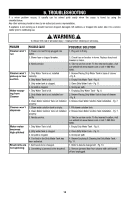
5. MAINTENANCE Familiarize yourself with these home maintenance tasks as proper use and care of your cleaner will ensure continued cleaning effectiveness. Any other servicing should be done by an authorized service representative. If appliance is not working as it should, has been dropped, damaged, left outdoors, or dropped into water, take it to a service center prior to continuing use. ! WARNING ! 5.1 5.2 To reduce the risk of personal injury - Unplug before cleaning or servicing. Cleaning the dirty water tank Note: During normal use of cleaning, debris may accumulate inside of dirty water tank. In order to keep your unit functioning properly and to prevent any odors from building up, it is best to rinse out your dirty water tank with fresh water after each use. 5.1 Remove dirty water tank from unit by pressing on latch and pulling the tank out at an angle. 5.2 Pull up on latches to open dirty water tank. Remove top and rinse tank with clean water. IMPORTANT Be sure to remove any debris that has accumulated in the filter screen. If the screen becomes clogged, this may reduce the performance of your cleaner. 5.3 To clean dirty water tank ducting, place dirty water tank under faucet and dispense high pressure clean water into the inlet port of the dirty water tank to backflush any loose accumulated debris. 5.4 Be sure to clean the filter screen that is located in the duct of the recovery tank base. 5.5 Allow tank to air dry completely. Pull up on latches then back down to lock. Latches will snap when locked. Replace dirty water tank back onto unit until it snaps. Note: The filter screen is not removable. Attempts to remove the filter screen from the tank may damage the filter screen. 5.3 5.5 5.4 Lubrication The motor and brushrolls are equipped with bearings which contain sufficient lubrication for their lifetime. The addition of lubricant could cause damage. Do not add lubricant to motor or bearings. 11
-
 1
1 -
2
-
3
-
4
-
5
-
6
-
7
-
8
-
9
-
10
-
11
-
12
-
13
-
14
-
15
-
16
-
 17
17 -
 18
18 -
 19
19 -
 20
20 -
 21
21 -
 22
22 -
 23
23 -
 24
24 -
 25
25 -
 26
26 -
 27
27 -
28
-
29
-
30
-
31
-
32
 |
 |