Hoover FH51000 Product Manual - Page 26
How to Replace - belt replacement
 |
View all Hoover FH51000 manuals
Add to My Manuals
Save this manual to your list of manuals |
Page 26 highlights
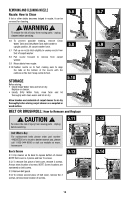
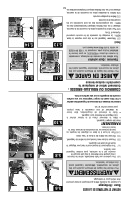
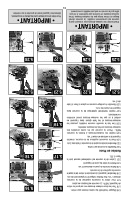
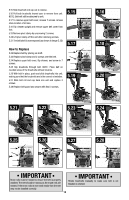
5.15 Slide brushroll end cap out to remove. 5.16 Pull both brushrolls toward user to remove from unit. NOTE: Belt will still be attached to unit. 5.17 To remove upper belt cover, remove 7 screws. Arrows show location of screws. 5.18 Flip cleaner upright and remove upper belt cover from foot. 5.19 Remove pivot clamp by unscrewing 2 screws. 5.20 Lift pivot clamp off the unit after removing screws. 5.21 The belt shaft is now exposed (as shown in image 5.22) How to Replace 5.22 Replace belt by placing on shaft. 5.23 Replace pivot clamp and 2 screws over the belt. 5.24 Replace upper belt cover, flip cleaner, and screw in 7 screws. 5.25 Slip brushrolls through belt. NOTE: Place belt on rounded areas of the brushrolls without brushes. 5.26 With belt in place, push and slide brushrolls into unit, making sure that the brushrolls are in the correct orientation. 5.27 Slide belt roll end cap back into unit and replace 3 screws. 5.28 Replace belt guard and secure with final 3 screws. 5.15 5.17 5.19 5.21 5.22 5.23 5.16 5.18 5.20 5.24 5.25 5.26 5.27 5.28 IMPORTANT Brush rolls must be rotated to ensure the belt is properly installed. The belt should be moving as the brush rolls are rotated. If the brush rolls do not rotate easily then the belt IMPORTANT Rotate brushrolls manually to make sure belt is not twisted or pinched. may not be installed correctly. 13
-
 1
1 -
2
-
3
-
4
-
5
-
6
-
7
-
8
-
9
-
10
-
11
-
12
-
13
-
14
-
15
-
16
-
17
-
18
-
19
-
20
-
 21
21 -
 22
22 -
 23
23 -
 24
24 -
 25
25 -
 26
26 -
 27
27 -
 28
28 -
 29
29 -
 30
30 -
 31
31 -
32
 |
 |
