Hotpoint RB525HCT Owners Manual - Page 40
Care and Cleaning, How to Remove Packaging Tape, Control Knobs, Glass Window, Control Panel - appliances
 |
View all Hotpoint RB525HCT manuals
Add to My Manuals
Save this manual to your list of manuals |
Page 40 highlights
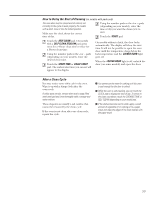
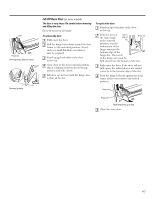
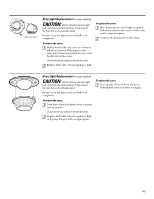
Care and cleaning of the range. Be sure all controls are off and all surfaces are cool before cleaning any part of the range. If your range is removed for cleaning, servicing or any reason, be sure the anti-tip device is re-engaged properly when the range is replaced. Failure to take this precaution could result in tipping of the range and cause injury. Groove Stem Molded rib Spring clip Clear groove in stem How to Remove Packaging Tape To assure no damage is done to the finish of the product, the safest way to remove the adhesive left from packaging tape on new appliances is an application of a household liquid dishwashing detergent, mineral oil or cooking oil. Apply with a soft cloth and allow to soak. Wipe dry and then apply an appliance polish to thoroughly clean and protect the surface. NOTE: The plastic tape (on some models) must be removed from all chrome trim. It cannot be removed if it is baked on. Control Knobs The control knobs may be removed for easier cleaning. To remove a knob, pull it straight off the stem. If a knob is difficult to remove, place a towel or dishcloth between the knob and control panel and pull gently. Wash the knobs in soap and water or a vinegar and hot water solution. Before removing the knobs for cleaning, please note that the knobs are in the OFF position. When replacing the knobs, check the OFF position to ensure proper placement. Do not bend knobs by pulling them up or down or by hanging a towel or other such loads. This can damage the shaft. To replace: Check the back of the knob. The molded rib of the knob is designed to fit perfectly onto the knob stem. Align the molded rib to the clear groove in the knob stem. Push the knob back as far as it will go. Control Panel It's a good idea to wipe the control panel after each use of the oven. Use a damp cloth to clean or rinse. For cleaning, use mild soap and water or a 50/50 solution of vinegar and water. For rinsing, use clean water. Polish dry with a soft cloth. Do not use abrasive cleansers, strong liquid cleaners, plastic scouring pads or oven cleaners on the control panel-they will damage the finish. Glass Window (on some models) To clean the outside glass finish, use a glass cleaner. Rinse and polish with a dry cloth. Painted Surfaces (on some models) Painted surfaces include the sides of the range and the door, top of control panel and the drawer front. Clean these with soap and water or a vinegar and water solution. Do not use commercial oven cleaners, cleaning powders, steel wool or harsh abrasives on any painted surface. 40
-
 1
1 -
2
-
3
-
4
-
5
-
6
-
7
-
8
-
9
-
10
-
11
-
12
-
13
-
14
-
15
-
16
-
17
-
18
-
19
-
20
-
21
-
22
-
23
-
24
-
25
-
26
-
27
-
28
-
29
-
30
-
31
-
32
-
33
-
34
-
 35
35 -
 36
36 -
 37
37 -
 38
38 -
 39
39 -
 40
40 -
 41
41 -
 42
42 -
 43
43 -
 44
44 -
 45
45 -
46
-
47
-
48
-
49
-
50
-
51
-
52
-
53
-
54
-
55
-
56
-
57
-
58
-
59
-
60
-
61
-
62
-
63
-
64
-
65
-
66
-
67
-
68
-
69
-
70
-
71
-
72
-
73
-
74
-
75
-
76
-
77
-
78
-
79
-
80
-
81
-
82
-
83
-
84
-
85
-
86
-
87
-
88
-
89
-
90
-
91
-
92
-
93
-
94
-
95
-
96
-
97
-
98
-
99
-
100
-
101
-
102
-
103
-
104
-
105
-
106
-
107
-
108
-
109
-
110
-
111
-
112
 |
 |
