Hunter 44660 User Guide - Page 11
Connect Wires and Mount Thermostat to, Wallplate - thermostat wiring
 |
View all Hunter 44660 manuals
Add to My Manuals
Save this manual to your list of manuals |
Page 11 highlights
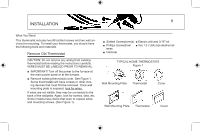
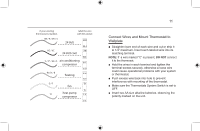
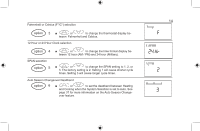
if your existing thermostat is marked... label the wire with this sticker: Y1 G W/B Y/0 RC RH RH / R / VR / 4 24 Volt RH RC / VC 24 Volt cool RC Y / C* / M / O air conditioning compressor Y/0 W / H / B heating W/B G / F fan G Y1 heat pump compressor Y1 11 Connect Wires and Mount Thermostat to Wallplate ■ Straighten bare end of each wire and cut or strip it to 1/4" maximum. Insert each labeled wire into its matching terminal. NOTE: If a wire marked "C" is present, DO NOT connect it to the thermosat. ■ Hold the wires in each terminal and tighten the terminal screws securely, otherwise a loose wire could cause operational problems with your system or thermostat. ■ Push excess wire back into hole to prevent interference with mounting of the thermostat. ■ Make sure the Thermostats System Switch is set to OFF. ■ Insert two AA size alkaline batteries, observing the polarity marked on the unit.
-
 1
1 -
2
-
3
-
4
-
5
-
 6
6 -
 7
7 -
 8
8 -
 9
9 -
 10
10 -
 11
11 -
 12
12 -
 13
13 -
 14
14 -
 15
15 -
 16
16 -
17
-
18
-
19
-
20
-
21
-
22
-
23
-
24
-
25
-
26
-
27
-
28
-
29
-
30
-
31
-
32
-
33
-
34
-
35
-
36
-
37
-
38
-
39
-
40
-
41
-
42
-
43
-
44
-
45
-
46
-
47
-
48
-
49
-
50
-
51
-
52
-
53
-
54
-
55
-
56
-
57
-
58
-
59
-
60
-
61
-
62
-
63
-
64
-
65
-
66
-
67
-
68
-
69
-
70
-
71
-
72
-
73
-
74
-
75
-
76
-
77
-
78
-
79
-
80
-
81
-
82
-
83
-
84
-
85
-
86
-
87
-
88
-
89
-
90
-
91
-
92
-
93
-
94
-
95
-
96
-
97
-
98
-
99
-
100
 |
 |
