Husqvarna TS142L Owner Manual - Page 24
Cutting deck, WARNING
 |
View all Husqvarna TS142L manuals
Add to My Manuals
Save this manual to your list of manuals |
Page 24 highlights
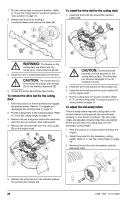
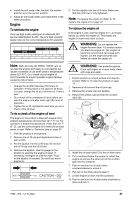
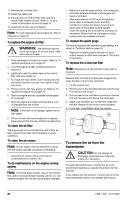
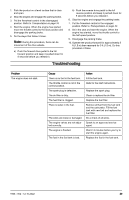
Cutting deck To remove and install the cutting deck Note: If an accessory other than the cutting deck is to be used, the front link and the rear lift links must be removed from the product. Also, the clutch cable spring must be put into the cable guide on the front edge of the lower dash. 1. Disengage the cutting deck. Refer to To engage and disengage the cutting deck on page 16. 2. Stop the product. Refer to To stop the product on page 14. 3. Lower the cutting deck to the lowest position. 4. Remove the drive belt from the clutch pulley (A). B G To adjust the parallelism of the cutting deck To do a visual side to side adjustment of the cutting deck If the cutting height is not the same on the right and left side of the product, the cutting height can be adjusted. Adjust the cutting height on the side of cutting deck that has the lower cutting height. 1. Make sure that the tires are fully inflated. 2. Park the product on a level surface. 3. Go to the side of cutting deck that has the lower cutting height. Note: Some models only have left side adjustment. 4. Adjust the cutting height with a 3/4" wrench. C HG A A J D F G E I J H 5. Remove the clutch cable (B), push the tab (C) and move the clutch cable out of the bracket. 6. Carefully remove the clutch cable spring (D) from the idler arm (E). 7. Disconnect the front link (F) from the cutting deck and remove the retainer spring and washer. 8. Remove the clips (G) and disconnect the suspension arms (H) from the chassis pins. 9. Disconnect the rear lift links (I) from the rear cutting deck brackets (J) on each side of the cutting deck. 10. Remove the cutting deck from the product. 11. Install the cutting deck in the opposite sequence. Make sure that the discharge side is on the right side of the product. Note: The suspension arms must be in forward position before you move the cutting deck below the product. Note: Each full turn of lift adjustment nut changes the cutting deck height 3/16" (4.7 mm). a) Turn the lift adjustment nut (A) to the left to lower the cutting deck. b) Turn the lift adjustment nut (A) to the right to lift the cutting deck. 5. Cut some grass and examine the results. Adjust if it is necessary. To do a precision side to side adjustment of the cutting deck 1. Make sure that the tires are fully inflated. 2. Park the product on a level surface. 3. Put the cutting deck in the transport position. Refer to To set the cutting deck in transport position or mow position on page 14. 4. Turn the outer blade tips to align with the cutting deck side to side. WARNING: The blades on the cutting deck are sharp and can cause injury. Use protective gloves. 24 1958 - 002 - 12.10.2022
-
 1
1 -
2
-
3
-
4
-
5
-
6
-
7
-
8
-
9
-
10
-
11
-
12
-
13
-
14
-
15
-
16
-
17
-
18
-
 19
19 -
 20
20 -
 21
21 -
 22
22 -
 23
23 -
 24
24 -
 25
25 -
 26
26 -
 27
27 -
 28
28 -
 29
29 -
30
-
31
-
32
-
33
-
34
-
35
-
36
-
37
-
38
-
39
-
40
-
41
-
42
-
43
-
44
-
45
-
46
-
47
-
48
-
49
-
50
-
51
-
52
-
53
-
54
-
55
-
56
-
57
-
58
-
59
-
60
-
61
-
62
-
63
-
64
-
65
-
66
-
67
-
68
-
69
-
70
-
71
-
72
-
73
-
74
-
75
-
76
-
77
-
78
-
79
-
80
 |
 |
