Husqvarna TS142L Owner Manual - Page 25
To replace the blades
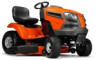 |
View all Husqvarna TS142L manuals
Add to My Manuals
Save this manual to your list of manuals |
Page 25 highlights
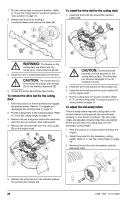
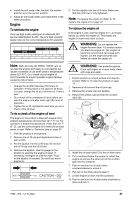
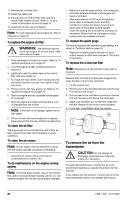
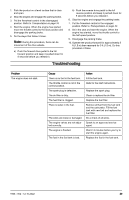
5. Measure the distance (B) from the bottom edge of the blade to the ground on the left and right side. 5. Measure the distance to the ground at the rear (A) and front (B) end of the blade. B B Note: The distance must be the same on the 2 sides. 6. Adjust the cutting height with a 3/4 in wrench. Note: Each full turn of the lift adjustment nut changes the cutting height with 3/16 in (4.7 mm). a) Turn the lift adjustment nut (A) to the left to lower the cutting deck. A B Note: To get the best cutting results, the blades must be adjusted until the front end is 1/8-1/2 in (3.1-12.7 mm) lower than the rear end when the cutting deck is in the highest position. 6. Go to the front of the product to make an adjustment. 7. Use a 11/16 in wrench to loosen the jam nut (C) to clear the lift adjustment nut (D). A D b) Turn the lift adjustment nut (A) to the right to lift the cutting deck. 7. Measure the distance again. Adjust until the 2 sides are equal. 8. Cut some grass and examine the results. Adjust if it is necessary. To do front to rear adjustment of the cutting deck The cutting deck must be level side to side before you do front to rear adjustment. Refer to To do a visual side to side adjustment of the cutting deck on page 24. 1. Make sure that the tires are fully inflated. 2. Park the product on a level surface. 3. Put the cutting deck in transport position. Refer to To set the cutting deck in transport position or mow position on page 14. 4. Turn the blades until they point straight forward. WARNING: The blades on the cutting deck are sharp and can cause injury. Use protective gloves. C 8. Adjust the cutting deck height with a 3/4 in wrench. Note: Each full turn of the lift adjustment nut changes the cutting deck height 1/8 in (3.1 mm). a) Turn the lift adjustment nut counterclockwise to lower the cutting deck. b) Turn the lift adjustment nut clockwise to lift the cutting deck. 9. Measure the front and rear distance again. 10. Adjust until the front end of the blade is 1/8-1/2 in (3.1-12.7 mm) lower than the rear end. 11. Hold the lift adjustment nut in position with the wrench and tighten the jam nut. To replace the blades For the best results, keep the mower blades sharp. Replace bent or damaged blades. CAUTION: Use only a replacement blade approved by the manufacturer. It is dangerous to use a blade not approved by the manufacturer of the product. This can cause damage to the product and void your warranty. 1958 - 002 - 12.10.2022 25
-
 1
1 -
2
-
3
-
4
-
5
-
6
-
7
-
8
-
9
-
10
-
11
-
12
-
13
-
14
-
15
-
16
-
17
-
18
-
19
-
 20
20 -
 21
21 -
 22
22 -
 23
23 -
 24
24 -
 25
25 -
 26
26 -
 27
27 -
 28
28 -
 29
29 -
 30
30 -
31
-
32
-
33
-
34
-
35
-
36
-
37
-
38
-
39
-
40
-
41
-
42
-
43
-
44
-
45
-
46
-
47
-
48
-
49
-
50
-
51
-
52
-
53
-
54
-
55
-
56
-
57
-
58
-
59
-
60
-
61
-
62
-
63
-
64
-
65
-
66
-
67
-
68
-
69
-
70
-
71
-
72
-
73
-
74
-
75
-
76
-
77
-
78
-
79
-
80
 |
 |
