Husqvarna TS142L Owner Manual - Page 28
WARNING, To remove the air from the, transmission, CAUTION
 |
View all Husqvarna TS142L manuals
Add to My Manuals
Save this manual to your list of manuals |
Page 28 highlights
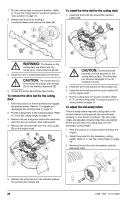
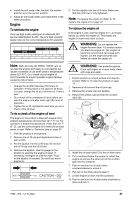
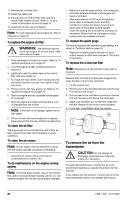
11. Remove the oil drain tube. 12. Install the yellow cap. 13. Fill with new oil in the oil filler tube and do a check of the engine oil level. Refer to To do a check of the engine oil level on page 27. 14. Install the oil tank cap and dipstick. Note: For safe disposal of used engine oil, refer to Disposal on page 35. To replace the engine oil filter WARNING: Use protective gloves. If you spill engine oil on your body, clean with soap and water. 1. Drain the engine oil from the oil tank. Refer to To replace the engine oil on page 27. 2. Turn the engine oil filter counterclockwise to remove it. 3. Lightly lubricate the rubber seal on the new oil filter with new engine oil. 4. To install the new oil filter, turn it clockwise until the rubber seal fits correctly, then tighten a half turn more. 5. Fill the oil tank with new engine oil. Refer to To replace the engine oil on page 27. 6. Start the engine and let it operate at idle speed for 3 minutes. 7. Stop the engine and make sure that there is no oil leakage from the oil filter. Note: If the there is oil leakage, tighten the oil filter again. 8. Fill the oil tank with more engine oil to replace the engine oil that the new oil filter has absorbed. To clean the air filter The engine will not run satisfactorily with a dirty air filter. Clean the air filter more frequently in dusty conditions. To clean the air screen Note: The air screen must be kept free of dirt to prevent engine damage caused by overheating. • Clean the air screen with a wire brush or compressed air to remove dirt. To do maintenance on the engine cooling system Note: A blocked grass screen, dirty or full cooling fins, and/or removed blower housing, and so on, can make the engine too hot and cause engine damage. • Make sure that the grass screen, the cooling fins, and other external surfaces of the engine are clean at all times. • After each interval of 100 hours of operation (more often in extremely dusty and dirty conditions), remove the blower housing and other parts of the engine cooling system. Clean the cooling fins and external surfaces as necessary. Make sure that the engine cooling system parts are installed correctly. To replace the spark plugs The spark plug type and clearance (gap setting) are shown in Technical data on page 35. • Replace the spark plugs at the start of each cutting season or after each interval of 100 hours of operation. To replace the in-line fuel filter Note: Replace the in-line fuel filter every year at minimum. Replace the in-line filter if it becomes clogged and stops the flow of fuel to the carburetor. 1. Let the engine cool. 2. Remove the in-line fuel filter (B) and seal the fuel line sections with plugs. 3. Put the new in-line fuel filter in position in the fuel line with the arrow pointing to the carburetor. 4. Make sure that there are no fuel line leaks and that the clamps (A) are in the correct position. 5. If you spill, immediately clean the product. A B To remove the air from the transmission CAUTION: Do not engage or disengage freewheel lever when the engine is in operation. To keep high performance, remove the air in the transmission before you operate the product for the first time. If you replace the transmission, remove the air in the new transmission before you operate the product. 28 1958 - 002 - 12.10.2022
-
 1
1 -
2
-
3
-
4
-
5
-
6
-
7
-
8
-
9
-
10
-
11
-
12
-
13
-
14
-
15
-
16
-
17
-
18
-
19
-
20
-
21
-
22
-
 23
23 -
 24
24 -
 25
25 -
 26
26 -
 27
27 -
 28
28 -
 29
29 -
 30
30 -
 31
31 -
 32
32 -
 33
33 -
34
-
35
-
36
-
37
-
38
-
39
-
40
-
41
-
42
-
43
-
44
-
45
-
46
-
47
-
48
-
49
-
50
-
51
-
52
-
53
-
54
-
55
-
56
-
57
-
58
-
59
-
60
-
61
-
62
-
63
-
64
-
65
-
66
-
67
-
68
-
69
-
70
-
71
-
72
-
73
-
74
-
75
-
76
-
77
-
78
-
79
-
80
 |
 |
