IBM 17352GX User Guide - Page 31
Installing the appliance horizontally in the 1-U rack mounting space
 |
View all IBM 17352GX manuals
Add to My Manuals
Save this manual to your list of manuals |
Page 31 highlights
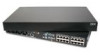
Chapter 2: Installation 15 Figure 2.2: Appliance vertical installation Installing the appliance horizontally in the 1-U rack mounting space NOTE: The filler panel must be placed in front of the rack when the appliance is mounted in the horizontal 1-U orientation. To install the appliance horizontally, complete the following steps: 1. Remove the screws on each side of the appliance. 2. Line up the holes in the long side of each mounting bracket. 3. With a Phillips screwdriver, fasten the mounting brackets to the appliance using two 8/32-inch x 1/2-inch pan-head screws on each side. 4. Attach four cage nuts or clip nuts to the rack mounting flange of the rack so that the nut is positioned on the inside of the rack. 5. Mount the appliance assembly to the rack by matching the holes in the short side of each mounting bracket to a set of matching holes on the rack. Insert the combination hex-head screws through the slots in the mounting bracket and the holes in the mounting rail, then into the cage nuts or clip nuts. Figure 2.3: Appliance horizontal installation
-
 1
1 -
2
-
3
-
4
-
5
-
6
-
7
-
8
-
9
-
10
-
11
-
12
-
13
-
14
-
15
-
16
-
17
-
18
-
19
-
20
-
21
-
22
-
23
-
24
-
25
-
 26
26 -
 27
27 -
 28
28 -
 29
29 -
 30
30 -
 31
31 -
 32
32 -
 33
33 -
 34
34 -
 35
35 -
 36
36 -
37
-
38
-
39
-
40
-
41
-
42
-
43
-
44
-
45
-
46
-
47
-
48
-
49
-
50
-
51
-
52
-
53
-
54
-
55
-
56
-
57
-
58
-
59
-
60
-
61
-
62
-
63
-
64
-
65
-
66
-
67
-
68
-
69
-
70
-
71
-
72
-
73
-
74
-
75
-
76
-
77
-
78
-
79
-
80
-
81
-
82
-
83
-
84
-
85
-
86
-
87
-
88
-
89
-
90
-
91
-
92
-
93
-
94
-
95
-
96
-
97
-
98
-
99
-
100
-
101
-
102
-
103
-
104
-
105
-
106
-
107
-
108
-
109
-
110
-
111
-
112
-
113
-
114
-
115
-
116
-
117
-
118
-
119
-
120
-
121
-
122
-
123
-
124
-
125
-
126
-
127
-
128
-
129
-
130
-
131
-
132
-
133
-
134
-
135
-
136
 |
 |
