IBM FAStT500 User Guide - Page 51
Attention, memory size as the one you are replacing. If you install a controller with
 |
UPC - 087944520320
View all IBM FAStT500 manuals
Add to My Manuals
Save this manual to your list of manuals |
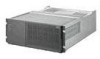
Page 51 highlights
Attention: When you handle static-sensitive devices, take precautions to avoid damage from static electricity. For details about handling static-sensitive devices, refer to "Handling static-sensitive devices" on page 29. 1 Remove the controller unit bezel, as shown in Figure 6 on page 11. Attention: Removing a controller that is operating normally (not failed) can result in data loss. Only remove a controller that: • Has a fault indicator light that is glowing • Is marked as "Failed" (offline) through the storage-management software. 2 Using Figure 16 on page 31 as a guide, remove the controller that has failed. a Squeeze the two center tabs and open the handles. b Remove the controller. c Close the handles and snap into place. Figure 16. Removing and installing a controller CRU Attention: To avoid potential data loss, make sure that the new controller has the same memory size as the one you are replacing. If you install a controller with a different memory size, the storage-management software suspends cache mirroring and issues an error message. If the memory size is not the same, you need to upgrade the cache memory. For more information, see "Installing additional cache memory in a controller" on page 33. 3 Unpack and check the new controller. Using the proper handling precautions, remove the new controller from the packing material. Check the shipping invoice and the controller to make sure that it has the same memory size as the controller that you just removed. 4 Using Figure 16 as a guide, install the new controller as follows: Chapter 3. Replacing controller unit components 31
-
 1
1 -
2
-
3
-
4
-
5
-
6
-
7
-
8
-
9
-
10
-
11
-
12
-
13
-
14
-
15
-
16
-
17
-
18
-
19
-
20
-
21
-
22
-
23
-
24
-
25
-
26
-
27
-
28
-
29
-
30
-
31
-
32
-
33
-
34
-
35
-
36
-
37
-
38
-
39
-
40
-
41
-
42
-
43
-
44
-
45
-
 46
46 -
 47
47 -
 48
48 -
 49
49 -
 50
50 -
 51
51 -
 52
52 -
 53
53 -
 54
54 -
 55
55 -
 56
56 -
57
-
58
-
59
-
60
-
61
-
62
-
63
-
64
-
65
-
66
-
67
-
68
-
69
-
70
-
71
-
72
-
73
-
74
-
75
-
76
-
77
-
78
-
79
-
80
-
81
-
82
-
83
-
84
-
85
-
86
-
87
-
88
-
89
-
90
 |
 |
